Showing posts with label gift. Show all posts

Friday, January 24, 2014

DIY Kitty Emoticon T-Shirt

I have been playing around with t-shirt paint lately and it's been a lot of fun! It is an inexpensive way to personalize a shirt for anyone. I am still trying to find the perfect fabric paint. so, if anyone has any recommendations please do share! I made a kitty emoticon t-shirt recently and here is the design for it for anyone who is interested: Kitty Emoticon T-Shirt Design.

The directions are pretty simple.

To get crisper edges you probably want to print your design on contact paper or anything that is adhesive but can also be removed easily from the fabric. I just did my printouts on regular paper. It will work fine if you are careful and not in a rush like me! For the painting process, just follow the instructions on the back of the container. This can be different from brand to brand and by time.

The first one I did was a gift for someone who is working on an iPhone game. I made a t-shirt with their logo design on it as a little encouragement. I think it turned out OK!

Below are a couple process pictures.

1) Cut out your design VERY carefully with an X-Acto knife.
2) Postion it on your t-shirt.
3) Apply paint per instructions.


Now, I need to buy more t-shirts so I can paint away.

I hope everyone has a great weekend! I am headed to Nashville tomorrow morning. Pictures to come...

Pin It Now!

Thursday, January 16, 2014

Panda Stuffed With Cuteness


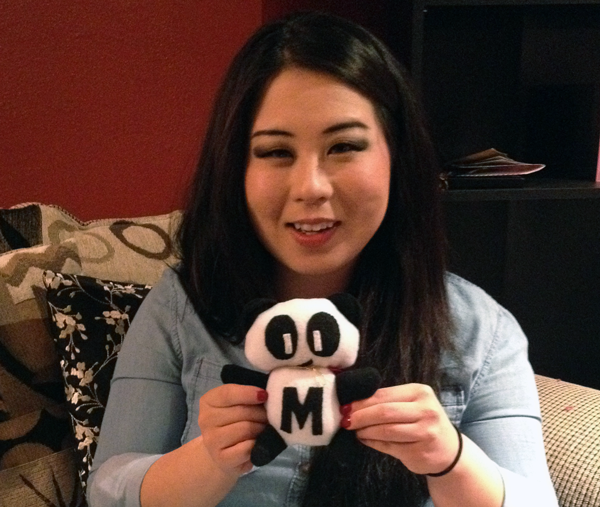
One of my good friends recently had a birthday and I was so excited to make her something. It would have been the second birthday of hers since I started my sewing endeavors. I decided to make her a stuffed panda, because we all associate her with pandas and who doesn't love pandas! I suppose that is why we all love her too :) I designed the panda with simple shapes, so it was fairly easy to do. The template is available here: Panda Pattern. I left the face up to your creativity. Please share what you come up with!

Materials:

  • 8x22" white fleece - body
  • 8x5" black fleece - limbs, ears
  • black and white felt (as needed for your face details and embellishments)
  • stuffing


Instructions:

  • Cut out all your pieces, including details for the face and any other "embellishments". I added the letter "M" for personalization for my friend's name. I think that is a nice touch, but you can just do a black oval chest as well.
  • Sew the face and embellishments by hand on the right side of the fabric. I am not so familiar with hand-sewing techniques, but I think that the stitches I used most represents blanket stitches. My stitches are perpendicular to the edge, where a straight stitch would be parallel. The reason I did it this way was so that the edges would lay flatter.

  • Sew the ear pieces together by placing wrong sides together. I wanted the raw edges for the ears, so did not plan do the whole "turn-right-side-out" routine.
  • Sew the limb pieces together by placing rights sides together. Turn right side out.
  • Stuff the limbs about 2/3 of the way. If you over-stuff, it becomes difficult to sew them to the body later.

  • Place the ears along the edge of the panda's face where the ears would go. Then, place the back piece for the head (wrong side up) on top of that. Pin together.
  • Sew the layers together and leave a 3" opening at the neck.

  • Turn right side out and stuff. Sew the gap close with blind stitches.

  • Place a body piece right side up and lay the limbs in position with the openings pointing outwards. As you can see in the picture, I have purposely made the limbs pieces slightly longer so that it would be easier to work with. Also, this why you do not want to stuff the limbs all the way.
  • Place the other body piece over the limbs, right side down. Pin and sew the layers together while leaving an opening for the neck.
  • Turn right side and stuff away! Blind stitch the opening closed.

  • Lastly, attach the head to the body. I don't know what the "best" way to do this is, but this is what I did... Pull the needle through the neck of the body, grab it from the other side, and pull the needle through the neck of the head. Repeat all the way across to secure.
Here's my friend presenting her new gift! As you may have noticed, her panda has a cape. Have some fun and add your own accessories!


Pin It Now!

Wednesday, October 30, 2013

Cool Pillow With Fraying Logo

Boulder, CO is easily one of my favorite cities in the US! I just got back from visiting a couple of my friends who just moved there a year ago and one of my good girlfriends also met us there. I love the mountains and my friends lived literally right next to the Flat Irons and it was beautiful. I loved the views, the weather, and the people! Most of the people seemed as laid-back and casual as they dressed and I loved the fact that it just seems like a very nonsuperficial city. I found it quite refreshing. I am bad about taking pictures, but some pictures will follow this post.

I decided I would make my friends something for being awesome hosts and welcoming my friend and me into their beautiful home. My friend, Daniel Galhardo, started a Japanese fly-fishing company in 2009 called Tenkara USA. It is a company that has grown quickly in a short amount of time and he has such a passion for what he does. Him and his wife took us to the Canyons in Boulder to teach us tenkara. I don't normally like fishing, but once I got the hang of this style of fishing, it was actually pretty fun. If you want more information about Tenkara, please visit his website: Tenkara USA. Anyway, I thought that I would make a throw pillow with their logo on it for them. It was pretty simple to do and you can do use this tutorial for any simple logo or image.


Materials:

  • canvas or upholstery fabric (I used (2) 13x13" pieces)
  • printout of logo enlarged to fit your pillow (choose a simple image with large cut out space)
  • contrasting fabric 2 inches bigger than your logo on all sides (makes it easier to sew)
  • stuffing


Instructions:
Cut out the pillow size you desire with 1/2" seam allowances all around.
Cut out the logo on the printout with an X-Acto knife.
Flip the image the wrong side up and trace it on the wrong side of a pillow piece.
Cut out the image with X-Acto knife or scissors.


Pin the contrasting fabric evenly to the wrong side of the pillow piece.
Edge stitch about 1/8" around the logo outline.
Place the right sides of the pillow pieces together and sew together with a 3-4" opening at the bottom.
Snip the corners, turn right side out and throw it in with your laundry!


When you take it out of the laundry you get this really cool fraying effect.
The stitching will keep it from fraying any more than desired.
Stuff and ladder stitch up the bottom.

Now you've got yourself a plush and cool pillow that make great gifts for anyone, including yourself :)

Pin It Now!

Wednesday, October 9, 2013

Felt Fortune Cookies

It's been a long time since my last post and that's no good... but I'm back! It has been a crazy summer and a lot has happened since my last post. Some good, some bad, but fortunately I have been able to find the good even where least expected. So now that I am getting back on track, I decided to go back to doing the things that I love.. crafts! I've also picked up a few musical hobbies, but we'll have to see how that goes!

I just got back from a trip to Dallas for a work conference/vacation. I visited some good girlfriends of mine and I had a great time with them. I've really discovered the importance of friends over the last couple months and the trip only exemplified that. I had a friend back in St. Louis who was going to take care of my kitties while I was gone, so I left her a small thank you note inside a fortune cookie. I came up with the idea because we are always having fun with our fortune cookies at the restaurant. It was simple and quick to make and I think they would make fun party favors too. Here's how to make them:

Material:
  • something circular for tracing (I used a CD)
  • a piece of felt to fit your circle
  • a thin strip of white paper no longer than the diameter of your circle
  • optional- hot glue gun (in the picture above, I used the glue gun for the cookie on the right and sewed the left one)

Instructions:
Trace and cut your circle on the piece of felt.
Fold the circle loosely in half and push in at the center of the fold while pulling the corners back.
Pin the center together and it should look like the bottom two pictures.
Sew the center together from the inside of the cookie or glue the center from the outside.

 Lastly, write a message onto your strip of paper and you've got a cute fortune cookie!
Do something nice for a friend :)

Pin It Now!

Monday, April 8, 2013

Fabric Picture Frames (Convertible to Hanging or Standing)


I am so excited to have a good friend of mine visit me from Dallas at the end of this month. She's been incredibly supportive about my sewing projects and aspirations. She's also been so patient to listen to me talk about it as frequently as I do. I wanted to make some her something, because there's nothing more rewarding to me then making something for someone I care about. I designed these fabric picture frames for her to hang in her cubicle (she's an accountant so she's there a lot right now!) They can be propped on a desk or hung on a wall. She had mentioned that she wanted to print out our Seattle/Portland trip pictures to display. The frames were pretty quick to make once I figured out how big I wanted them to be. This tutorial is for a frame with a 2.5" square window, but you can customize this easily.


Materials:

  • (1) 12.5x5" piece of fabric (I went with upholstery fabric)
  • (1) manila folder
  • embroidery floss and needle
  • small piece of adhesive Velcro

Instructions:


  • Take your piece of fabric and mark up the lines as pictured above on the wrong side of the fabric. The black lines are the fold/hem lines and the red lines are cut lines. The pattern has 4 panels, starting from the top of the image: 1) back stand-outer, back stand-inner, frame front, frame back.
  • Start by sewing around the 2.5" square. This is to keep the corners from fraying when you cut your "X". (I unfortunately didn't think to do this when I made my frames. It dawned on me while I was in bed.)
  • Cut "X" through the middle of that square. Trim down the triangle pieces to about .25" flaps. 

  • Fold/iron these flaps on the 2.5" square line, wrong sides together. Sew them down. (Iron consistently throughout this project to keep good creases and to get a more professional look.)
  • Hem the long sides, then hem the short sides.
  • Cut a piece of manila folder into a 4.5" square.
  • Fold the two back stand pieces wrong sides together and slip the folder piece in between. The folder piece should not be exposed, so trim if necessary. Sew all 4 sides together. (The manila folder adds stiffness.)

  • Fold the frame back and front wrong sides together and sew only the outer three other sides. The unsewn side will be the opening to insert a picture.
  • Cut another piece of manila folder just big enough to fit inside the pocket.


  • Stick a small piece of Velcro at the bottom of the insides of frame. This keeps it flattened when the frame is hung.
  • Poke the embroidery floss from the inside of the fold of the frame about 1/2" from the center. Pull the floss back through with equal spacing. Leave a small loop on the outside of the frame, tie the ends from the inside and trim. The loop can be pulled taut and hidden when used on a desktop.

I think these would make great gifts and I can't wait to make more!

Pin It Now!

Wednesday, January 9, 2013

Coffee Cup Sleeve 2.1 & Fabric Gift Bag

I've been excited to share some of the things I've been making and am glad to finally have the opportunity to do so! It was recently one of my friend's birthday, so I bought her some items and made some. I was going to make her a makeup bag, but I just didn't have enough time to try something new. We were going to meet up at a coffee shop so it was only fitting that I make her one of my favorite things to make, a cup sleeve. To make this, you can follow my tutorial here: Coffee Cup Sleeve 2.0. The only difference is that I took some of the "slant" off the ends from my pattern. It won't be necessary to do that if you grab a coffee sleeve from a coffee shop beforehand (I didn't have one on hand). I also made an impromptu gift bag. :) With gift bags being typically at least $0.50 to purchase, making your own is much cheaper, takes little time, customizable, and can be reused for other things. I didn't take any procedural pictures because I was in a rush and figured it was easy enough to just provide a quick explanation. When the next opportunity arises, I'll provide a more in-depth tutorial in case anyone needs it or make a better gift bag. :)


  • Just place your items on the fabric to figure out how big you need to cut it, include room for the bulk of the items and 1/4" seam allowances. Cut on the fold so that you have one long piece.
  • Fold right sides together and sew the two sides and leave an opening on top. Hem the opening.
  • Cut a piece of printed scrapbook paper or similar and punch a hole in it for the gift tag.
  • Cut two pieces of cording, ribbon, yarn, or similar to use as handles. Cut lengths in appropriate proportions to the size of your bag.
  • Pull one of the handle pieces through the gift tag and sew a handle piece to the insides of the opening. Sew on the hem line. Turn right side out and voila!


Pin It Now!

Tuesday, January 1, 2013

Heat Pack

The BF was complaining about neck and shoulder pain, so what did I do? I sewed together an impromptu heat pack for him. I'm sure there are better ways to do this and better material to fill the bag with other than rice, but I just threw together whatever I already had. It was one of the easiest projects I've put together so far and I think these would make great gifts. You could jazz it up with scented oils and other scented ingredients. It's essentially the same as making a small pillow and pillowcase. Hope you guys like it!


Materials:
  • 3.5x12.5" cotton fabric cut on the fold (it should measure 3.5x25" unfolded) - bag
  • 3.75x13.75" cotton fabric cut on the fold - case
  • 3 C of white rice or other filling

Costs:
  • bag fabric ~ $2/yd, Joann
  • case fabric ~ $7/yd, Joann

Instructions:


  • Place the bag piece right side up. Fold in half so that right sides are together and sew the long sides as seen above. Leave a 1/4" seam allowance.
  • Turn the bag right side out, iron flat, and top stitch 1/8" from the edge all around. Stop 1/2" before you reach the opening.


  • Fill the bag with rice. You don't want it so full to the point where it becomes too bulky and not pliable. Hold the opening closed and feel the bag out to determine if it needs more rice.
  • Once you are done filling the bag, hold the bag up by the the open end so that all the rice drops to the closed end. Fold the open edges inward about 1/4" and top stitch that end twice (you should be able to continue from where you had stopped top stitching earlier. Stitches should also be 1/8" from the edge).

  • Lay the case piece right side down and fold in 1/2" at the short ends.
  • Turn the piece over and bring the left end 5" from the edge of the right end. Right sides should be facing each other.

  • Fold the right end over the left end so that the 1/2" folds lay on top of each other.
  • Sew with a 1/4" seam allowance along the long sides only. Be sure to keep the folds down.


  • Turn the case right side out, iron flat, and top stitch 1/8" from the edge all round.
  • Insert the bag of rice. The easiest way to do this is to hold one end of the bag up so all the rice falls down to the other end. Then, insert the "full" end in first. It should not be difficult to insert the bag, yet it should be snug.
  • Heat for about 45 secs and apply where needed. The pad will remain heated for about 20 mins.

Pin It Now!

Thursday, December 20, 2012

Reversible Placemats


I finally finished my Christmas present for Mike's mom. Yay! It is a set of eight reversible placemats. One side is for fall and the other for winter. I used prints that didn't necessary scream Thanksgiving or Christmas but had the essence of it. It's quite simple to make but I'd be lying if I said that it was quick. I've been working on it here and there for a while now... changing fabric choices and insulating material, putting hours into making tons of bias tape, and then struggling to attach the bias tape. I originally started with fusible interfacing to add thickness, but thought it was too thin. Then, I got Insul-Brite but hated the "crunching" noise the material made and how the insulation stuff would come off in speckles on everything. I considered fleece and batting, that would be a tad thicker than I'd like and require quilting stitches. I settled with felt, but you should use whatever you feel comfortable with to achieve the thickness you want.


Materials:
  • 14x18" front fabric per placemat
  • 14x18" back fabric per placemat
  • 14x18" material for insulation per placemat
  • 5.5 ft of bias tape per placemat (buy or make your own, see: Homemade Bias Tape)

Costs:
  • front fabric ~ $3.25/yd, Joann
  • back fabric ~ $2.50/yd, Joann
  • felt ~ $0.75/yd, Joann
  • homemade bias tape ~ $2

Instructions:

  • Lay your pieces in this order: back (right side down), insulating material, front (right side up).
  • Sew zig zag stitches along the edge. Trim if necessary. (I prefer this method over having to turn the layers right side out after sewing. This method produces cleaner, less bulky edges and crisper corners.)
  • Attach the bias tape (Here is a good tutorial on how to do this: (Bias Tape: How To Make It & Attach It).
Sew away!

Pin It Now!

Sunday, December 2, 2012

Coffee Cup Sleeve 2.0

Update:


A couple days ago I posted a tutorial for a Coffee Cup Sleeve. I just finished another sleeve with a sleeker design. This design requires a bit more precision and took me longer to complete, but I think that in the end it was worth it. Since I have a few of these to make, I am going to keep playing around with different construction design. Stay tuned for my velcro version!

Materials:
  • 4x12" front fabric
  • 4x12" back fabric (use canvas, drapery, or other heavy weight fabric if not using a third insulating layer or interfacing)
  • 4x12" insulating material or interfacing (optional, I did not use)
  • 1 button (medium to large)
  • 1 hair elastic
  • marking tool
  • bobby pins
  • needle/thread for hand-sewing (for the button and elastic)

Costs:
  • front fabric ~ $1.25/yd, Joann
  • back fabric ~ $1/yd, Joann
  • button ~ $0.50/pk, Joann

Instructions:


  • Trace a coffee cup sleeve onto the wrong side of your back fabric.  I accidentally threw away my Starbucks sleeve, so I just traced the sleeve I already made.
  • If you want to just draw the shape yourself, then place points in the same positions as the diagram and draw your curves accordingly
  • Cut out the back and trace it onto the wrong side of the the front fabric and cut.


  • Starting with the back fabric (right side down), carefully fold in 1/4" all around and iron.
  • Place the front fabric (right sight down) over the back fabric, fold in the sides and iron. Use the back fabric as a guide to make sure that the edges of both pieces meet as closely as possible.
  • If you are adding interfacing or other material in the middle, then trace the front over the material. Cut slightly inside the lines so that the piece is ever so slightly smaller than the front fabric. Place it inside the folds of front fabric. Iron, if necessary.


  • Take the elastic and sew the middle together. You want a loop just big enough to fit your button. Cut off the excess.
  • Place pieces in this order: back-right side down, elastic on one end, and front-right side up. Pin the end with the elastic together and also the longest side (you want the buttom unpinned so you can sew the button on with hidden stitches).
  • Bring the ends together (with some overlap) and mark where you want the button to be. Sew the button onto the front fabric only.
  • Pin the rest of the sides and top stitch all around. I double stitched the elastic end for more security and did the same on the other side to match.

Pin It Now!

Friday, November 30, 2012

Coffee Cup Sleeve

Update:
Coffee Cup Sleeve 2.0 (improved sleeker design)
Coffee Cup Sleeve 2.1 & Fabric Gift Bag


I loves owls and I was so happy when I found such a cute owl flannel remnant at Joann's. I had this exact project in mind when I saw this fabric. Owls, Starbucks, being green... perfect! I had seen it by the bolt and figured I'd check the remnants to see if it was there and it must have been my lucky day! On a side note, I LOVE remnants. I usually only need a small amount of fabric for this and that, so why not get the extra discount for remnants to get the same amount of material I would have gotten anyway?

It's on the bulky side, but I kind of liked that because of the flannel material. Cozy and cushy. I'll be making a different one with less weight as an alternative sleeve.

Materials:
  • 3.5x11" front fabric
  • 3.5x11" back fabric
  • 3.5x11" felt, interfacing, batting, or omit if your fabrics are thick
  • 2 buttons
  • 1 hair elastic
  • marking tool
  • bobby pin
  • a chop stick or similar (for poking corners of the fabric out when turned right side out)
  • needle/thread for hand-sewing

Costs:
  • front fabric ~ $0.50/yd, Joann
  • back fabric ~ $1.25/yd, Joann
  • buttons ~ $1/300pk, Joann
  • felt ~ $0.50/yd, Joann

Instructions:

I used a sleeve from Starbucks as the template.  Be sure to have an idea of image placement if you are using a printed fabric that has a wide image design like mine.


  • Trace the cardboard sleeve onto the wrong side of the front fabric and added a second outline with a 1/4" seam allowance.
  • Fold the sleeve in where the bents were and marked the sides on the fabric.  This helps to make sure that image will be centered properly.

  • Cut out the pattern and lay it over the back fabric.  To make things easier, cut a rectangular just big enough to fit the pattern.
  • Cut a piece of felt the same size, if necessary.
  • Layer the fabric in this order: felt (if using), back-right side up, front-right side down.
  • Sew along the inner outline, leaving one end open.
  • Trim the up the seam allowance and snip off the corners.
  • Turn it inside out (this where the chop stick helps) and iron.
  • Cut the elastic band in half and sewed the ends together by hand.
  • Poke through one end of the band (pierce the actual elastic) and into the other end.  Then, I wrap the thread tightly around both ends 2-3 times, sewed into the ends, and repeated at least 4 times.

Now, it's time to close up the sleeve.
  • Fold the layers of fabric inwards for a 1/4" seam and pin the elastics into the layers.
  • Top stitch all around for a clean finish.
  • Bring the ends together and mark the position of the buttons, sew the buttons on and your done!

Pin It Now!