Showing posts with label cat. Show all posts

Thursday, December 12, 2013

Template for "Secret Santa" Christmas Card


In my last post, I shared with you my free Secret Santa e-card. In addition to e-cards, I will be giving out some printed cards as well. I made a template of the same design for letter-sized media (card stock recommended) and the PDF files are available for download below. Each page will print two cards. Follow your printer's directions for proper layout and do a test print to make sure that all sides are aligned. Once the card is printed, write in your special message and jazz it up! For my cards, I hand drew the snow on the ground with a silver coloring pencil. Then, I used a small paint brush to dot glue (I used Mod Podge) on the front and back for the falling snow and sprinkled fine glitter dust over it. I also did glittered zig zags in the snow. There's many ways you can personalize yours and I'd love to see how yours turns out!

File 1: This is the front and back of the card.

File 2: This is the inside of the card.

I had a lot of fun doing this, aside from a little glittery mess I made. I think it's awesome to receive custom or handmade cards and I hope that my recipients think so too!

Pin It Now!

Sunday, April 21, 2013

Pet Bed 2.0

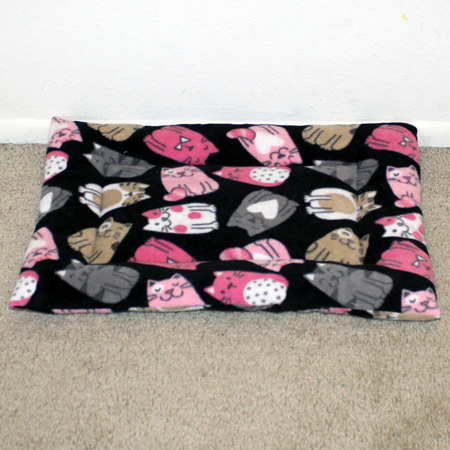
I originally accummulated a ton of fleece and polyfill to make kitty/dog beds to donate to the Humane Society, but I decided to start by donating to my Vet's office instead for their amazing service. The first pet bed I made took me a LONG time [Cozy Fleece Dog (Cat) Bed], so I decided to do a simpler design for this project. I was able to finish three beds and some chew toys in the last couple of days, just in time for Derpy's post-surgery pickup (poor guy went in for a fractured femur if you didn't see my previous post). Each bed took me about an hour to complete. It was maybe ten minutes tops to sew, but stuffing was the hardest part. Hopefully, you are a better stuffer than I am and can finish in less time.


Materials:
  • fleece
  • stuffing

Instructions:

First, figure out the size of the bed.
  • The center should be big enough to fit your pet and have at least a 4" wall all the way around (4" was perfect for me to fit my hands through and stuff, but you may need to adjust this).
  • Cut on the fold at one of the shorter sides.
  • Include .5" seam allowance for the 3 sides not on the fold.
With the piece folded in half, right sides together, sew the three sides.
Leave a gap large enough to fit your hand through on the long sides.

Turn it right side out and chalk/sew the center seams.
Leave a gap on one side of the center, align it with one of the outer wall gaps.


Stuff the center and close up the gap (this fit under my sewing machine nicely).

Stuff the walls. Tease filling and stuff gently, otherwise it will be lumpy.
Sew the gap closed (here is a tutorial on how to do this: Invisible Closing Seams).

Here are the beds and toys I ended up giving to the vet's office.

I ended up making a bed for Derpy out of his fleece I had been using for the animals' blanket.

I also made a simple stuffed kitty from the fabric scraps.


I have some cute prints I'd like to use for the next ones and I'm looking forward to dropping them off when Derpy goes to get his stitches removed. In case anyone is wondering, Derpy appears to be recovering well from his surgery!

Pin It Now!

Wednesday, April 17, 2013

Too Many Vet Visits In One Week!

Mr. Winston was neutered just last Wednesday. The poor guy were a was stumbling around clumsily and running into things the days he wore the cone. He looked sad but also a little goofy as well.

I was back in at the Vet today for one of my kitties, Derpy. Winston had accidentally injured him and now he has a fractured femur. :( Poor guy was in so much pain last night and is now staying overnight at the clinic and awaiting surgery tomorrow. It's fortunate that I have a great vet and everyone in the office is extremely service oriented. Not only is the medical and customer service phenomenal, but I can't believe how much cheaper their prices are compared to others. I'm planning on making some small beds and chew toys to donate to the office for the pets that stay overnight. Hopefully, I can get some things completed by Saturday when Winston gets his stitches removed.

This week has been exhausting between work, the pets, and personal projects. It's only Wednesday, but I'm already looking forward this weekend! I wish there were more interesting things going on in my life to report, but this is my life for the time being. It's enough to keep me busy though!

Pin It Now!

Sunday, November 25, 2012

Cat in the Hat

I hope everyone had an awesome Thanksgiving!  Oh man, how I miss that deep fried turkey!  I don't think that I have had traditional oven-cooked turkey for Thanksgiving in years.  I need to start working on shedding a couple extra pounds soon.

I thought I'd post a quick tutorial today of a Cat in the Hat hat that I made for my kitties.  I don't have any pictures of the process, but the instructions should be simple and clear enough to do without.  It isn't much, but I figured that I've got to start somewhere.  I made my kitties the hat and a red bow tie, but they have since destroyed both (yes, that's how much they loved them...)  I do not dress my kitties, but Derpy looks the part so much that I couldn't resist.

 Materials:
  • 1/6 yd of white and red felt
  • bobby pins
  • elastic (optional)

 Cost:
  • Felt ~ $2.50/yd, Joann

 Instructions:


  • Sew a red and white strip together (use 1/4" seams for this project).  Open this up with the seam on the bottom.  Place a red strip on top of the white strip and sew together.  Continue in this fashion until all strips are sewn.  The body should start and end with a red piece and all seams should be on the same side.
  • Bring both sides of the body together with the seams facing out.  Sew together.
  • Pin the top circle to one end of the striped tube and carefully sew onto the tube.
  • Turn it all right side out.  Pin the brim to the other end of the bottom of the hat.  Sew so that the seams are underneath.  Iron out if necessary.
  • Sew an elastic piece on the inside seams of the brim, if desired.
Now, good luck getting your kitty or pet to wear it!


Pin It Now!