Showing posts with label stuffed animal. Show all posts

Thursday, January 16, 2014

Panda Stuffed With Cuteness


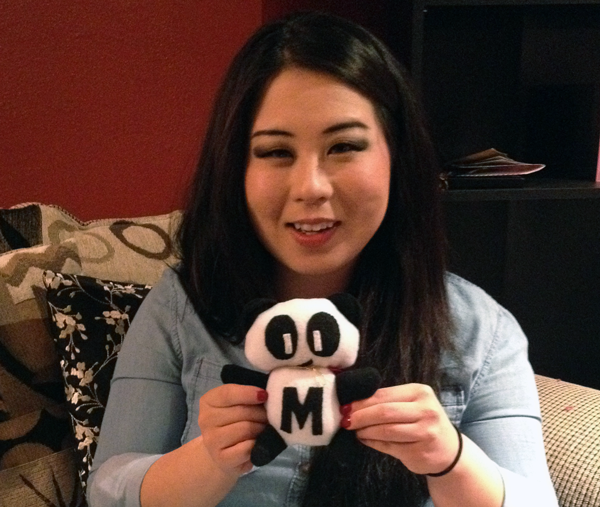
One of my good friends recently had a birthday and I was so excited to make her something. It would have been the second birthday of hers since I started my sewing endeavors. I decided to make her a stuffed panda, because we all associate her with pandas and who doesn't love pandas! I suppose that is why we all love her too :) I designed the panda with simple shapes, so it was fairly easy to do. The template is available here: Panda Pattern. I left the face up to your creativity. Please share what you come up with!

Materials:

  • 8x22" white fleece - body
  • 8x5" black fleece - limbs, ears
  • black and white felt (as needed for your face details and embellishments)
  • stuffing


Instructions:

  • Cut out all your pieces, including details for the face and any other "embellishments". I added the letter "M" for personalization for my friend's name. I think that is a nice touch, but you can just do a black oval chest as well.
  • Sew the face and embellishments by hand on the right side of the fabric. I am not so familiar with hand-sewing techniques, but I think that the stitches I used most represents blanket stitches. My stitches are perpendicular to the edge, where a straight stitch would be parallel. The reason I did it this way was so that the edges would lay flatter.

  • Sew the ear pieces together by placing wrong sides together. I wanted the raw edges for the ears, so did not plan do the whole "turn-right-side-out" routine.
  • Sew the limb pieces together by placing rights sides together. Turn right side out.
  • Stuff the limbs about 2/3 of the way. If you over-stuff, it becomes difficult to sew them to the body later.

  • Place the ears along the edge of the panda's face where the ears would go. Then, place the back piece for the head (wrong side up) on top of that. Pin together.
  • Sew the layers together and leave a 3" opening at the neck.

  • Turn right side out and stuff. Sew the gap close with blind stitches.

  • Place a body piece right side up and lay the limbs in position with the openings pointing outwards. As you can see in the picture, I have purposely made the limbs pieces slightly longer so that it would be easier to work with. Also, this why you do not want to stuff the limbs all the way.
  • Place the other body piece over the limbs, right side down. Pin and sew the layers together while leaving an opening for the neck.
  • Turn right side and stuff away! Blind stitch the opening closed.

  • Lastly, attach the head to the body. I don't know what the "best" way to do this is, but this is what I did... Pull the needle through the neck of the body, grab it from the other side, and pull the needle through the neck of the head. Repeat all the way across to secure.
Here's my friend presenting her new gift! As you may have noticed, her panda has a cape. Have some fun and add your own accessories!


Pin It Now!

Saturday, June 29, 2013

Stegosaurus Remade

I'm excited that for the first time, I've been commissioned to sew! I'm thrilled, because it involves making stuffed animals and those are so much fun. I love coming up with the patterns and designs, but I just hate stuffing them! Today, I got a chance to remake my Stegosaurus from a few months ago (original post here). This was my first stuffed animal and the only one I have used a pattern for so far. I feel like making this the first time gave me a good start because it made me understand the general how-tos of a simple stuffed animals. I've been able to expand on it since then. I could see a significant improvement in my second go at it. The feet were very difficult for me to do the first time and I had jagged looking feet pads. I decided that I would baste the feet to the legs first this time and it helped. The feet pads turned out much smoother and circular. The legs also turned out thicker, which I like. I'm still experimenting with stuffing brands and different techniques, but please do tell me your recommendations! In the next week I get to remake my turtle and design a doggy hand puppet. I've never done a puppet before, so I'm excited for the challenge! Well, that's what I am working :) That and moving... but moving is not nearly as fun.

Pin It Now!

Tuesday, May 28, 2013

Sea Turtle Stuffed Animal

With being sick and just plain busy, I haven't been too productive in the crafts department. Instead, I've been spending most of my time reading (currently working on the first book of Game of Thrones and looking for a good book on the history of European Art) and brainstorming for project ideas. Today, I decided that I needed to complete a project, sick or not! I've been meaning to make some stuffed animals for Winston, because it seems like every week I'm spending $10 on a new toy. I wanted to make Winston something that was somewhat floppy so he can toss it around easily (he likes to play fetch with himself when I am busy). I decided to go with a sea turtle so I could do the flippers and flatter shell version. I created my own pattern for this and have included it in PDF format. It should print to scale. You can use whatever fabric type you prefer, but I used fleece.


Materials:

Instructions:
  • When tracing the pattern pieces, be sure to add 1/2" allowance and to cut on the fold where instructed.
  • Cut the body pieces on the green fabric.
  • Cut one shell piece on the dark brown fabric.
  • Cut one shell piece on the light brown fabric.
  • Cut the pupils and eyes on the black and white felt, respectively.


  • Hand sew the pupil piece on top of the white piece as seen above.
  • When finished, do not cut the thread yet.
  • Trim the excess pupil fabric off so that the pupil is flush with the white.

  • Sew the eye onto the right side of one of the head pieces (be sure to stay within your seam allowance).
  • Repeat the previous steps on the other eye and sew to the head piece symetrically.

  • Place right sides together of each set of limbs, tail, and head pieces.
  • Sew all around and leave the straight ends open.
  • Cut notches on any concave curves before turning the pieces right side out.

  • Lightly stuff the flippers so they remain somewhat flat (you could probably leave them unstuffed too).
  • Stuffed the head tightly to get a rounded shaped.

  • Sketch a shell design on you top shell piece and sew with a contrasting thread.
  • It doesn't have to be perfect and you can use random shapes in the design. I went with the design above to make sewing easier. I sewed columns of zigzags first from the head to the tail end. Then, I rotated the shell on its side and sewed the straight lines (top and bottom of the hexagons). To save time, I didn't cut my threads after each straight line. After my backstitches, I just moved the shell over the next section and continued sewing.

  • Place the bottom shell piece right side up.
  • Pin the neck of the head piece to the top of the shell (the wider, flatter end). Make sure the top of the head is facing up!
  • Also, pin the flippers as pictured above.

  • Once all the body pieces are pinned, pin the top shell right side down over the ensemble. Remove the pins from the previous step as you do this.
  • Sew all around, but leave 4" open at the tail end.
  • Turn it right side out and stuff the shell. Sea turtle shells are flatter, so do not over stuff.
  • Pin the tail in place and sew the open shut with ladder stitches.

Winston has a new friend!
    

Pin It Now!

Friday, March 22, 2013

Stuffed Owl


It's an owl, Setzer! I had so much fun making the stegosaurus a few weeks ago that couldn't wait to make another stuffed animal. I decided to jump right in and make my second one without a pattern. I've had this design in my head for a couple of weeks already but couldn't pull the trigger. I gathered a bunch of different fabrics for variations and ended up settling for this girly softer version (mainly because I forgot to get dark brown for the body) :) The next one is going to be bigger, bolder, and better. :D I used flannel and quilting fabric. I am happy with how this turned out. Do you like it?


Pin It Now!

Sunday, February 24, 2013

Stegosaurus: Adorable Homemade Plush Animal


I had a 3 year old boy's birthday party to go to on Saturday and Friday night I made an impromptu decision to sew something for the party. I have tons of polyfill and had been interested in doing some stuff animals, so I picked the cutest (and easiest) one to make from a book called One-Yard Wonders. This Stegosaurus design was by Caitlin Bell. Patterns come with the book.


It was rather easy to make. It would have been easier if the book provided pictorial instructions. I would recommend the book. It has a lot of cool projects I just can't wait to try. Also, maybe all text-based instructions aren't too bad. It actually forced me pay attention to the instructions and try to understand it rather than just mimicking an image. They are also pretty well written. The book, among other awesome sewing gifts, was a courtesy of the BF during Christmas. :)

My biggest challenge was sewing the feet to the legs. Some looked better than others, but they turned out okay and the flaws weren't too noticeable. Also, I came to the conclusion that minor flaws add character. :) I had so much fun doing this that I'm inspired to create some cute animal designs of my own! Stay tuned for more!

6/29/13: Here's the second one I made: http://cupofthreads.blogspot.com/2013/06/stegosaurus-remade.html

Pin It Now!