Showing posts with label decor. Show all posts

Wednesday, October 30, 2013

Cool Pillow With Fraying Logo

Boulder, CO is easily one of my favorite cities in the US! I just got back from visiting a couple of my friends who just moved there a year ago and one of my good girlfriends also met us there. I love the mountains and my friends lived literally right next to the Flat Irons and it was beautiful. I loved the views, the weather, and the people! Most of the people seemed as laid-back and casual as they dressed and I loved the fact that it just seems like a very nonsuperficial city. I found it quite refreshing. I am bad about taking pictures, but some pictures will follow this post.

I decided I would make my friends something for being awesome hosts and welcoming my friend and me into their beautiful home. My friend, Daniel Galhardo, started a Japanese fly-fishing company in 2009 called Tenkara USA. It is a company that has grown quickly in a short amount of time and he has such a passion for what he does. Him and his wife took us to the Canyons in Boulder to teach us tenkara. I don't normally like fishing, but once I got the hang of this style of fishing, it was actually pretty fun. If you want more information about Tenkara, please visit his website: Tenkara USA. Anyway, I thought that I would make a throw pillow with their logo on it for them. It was pretty simple to do and you can do use this tutorial for any simple logo or image.


Materials:

  • canvas or upholstery fabric (I used (2) 13x13" pieces)
  • printout of logo enlarged to fit your pillow (choose a simple image with large cut out space)
  • contrasting fabric 2 inches bigger than your logo on all sides (makes it easier to sew)
  • stuffing


Instructions:
Cut out the pillow size you desire with 1/2" seam allowances all around.
Cut out the logo on the printout with an X-Acto knife.
Flip the image the wrong side up and trace it on the wrong side of a pillow piece.
Cut out the image with X-Acto knife or scissors.


Pin the contrasting fabric evenly to the wrong side of the pillow piece.
Edge stitch about 1/8" around the logo outline.
Place the right sides of the pillow pieces together and sew together with a 3-4" opening at the bottom.
Snip the corners, turn right side out and throw it in with your laundry!


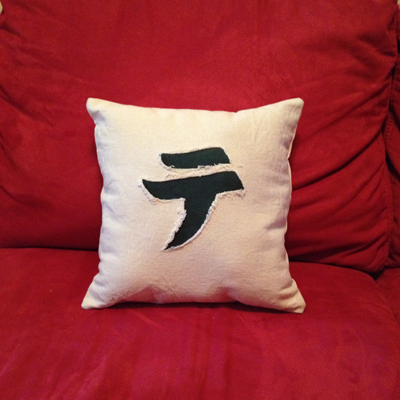
When you take it out of the laundry you get this really cool fraying effect.
The stitching will keep it from fraying any more than desired.
Stuff and ladder stitch up the bottom.

Now you've got yourself a plush and cool pillow that make great gifts for anyone, including yourself :)

Pin It Now!

Wednesday, May 29, 2013

Orchids Triptych Painting

I figured that it was about time that I made some contributions to my "Art" section, so I'll be posting some paintings in the next few posts. :)

I am absolutely in love with orchids. It's my favorite type of flower and I am always trying to grow them. Unfortunately, it's difficult for me to find a good place for them to get the right amount of filtered light AND be safe from the pets. I figured that a painting would last longer and so I took a stab at painting. I was pleased with the turn out and was surprised. I hated painting in art class when I was in school. I was horrendous. I think I grew some patience over the years. I found an orchid painting that I liked from here and did my version on three canvas that now hang in my living room. I contacted the original artist (Kerry Crutcher) and he was kind enough to let me post my version in this blog.

Orchids, acrylic on three 20x10" canvases - March 1, 2012

Pin It Now!

Sunday, April 21, 2013

Pet Bed 2.0

I originally accummulated a ton of fleece and polyfill to make kitty/dog beds to donate to the Humane Society, but I decided to start by donating to my Vet's office instead for their amazing service. The first pet bed I made took me a LONG time [Cozy Fleece Dog (Cat) Bed], so I decided to do a simpler design for this project. I was able to finish three beds and some chew toys in the last couple of days, just in time for Derpy's post-surgery pickup (poor guy went in for a fractured femur if you didn't see my previous post). Each bed took me about an hour to complete. It was maybe ten minutes tops to sew, but stuffing was the hardest part. Hopefully, you are a better stuffer than I am and can finish in less time.


Materials:
  • fleece
  • stuffing

Instructions:

First, figure out the size of the bed.
  • The center should be big enough to fit your pet and have at least a 4" wall all the way around (4" was perfect for me to fit my hands through and stuff, but you may need to adjust this).
  • Cut on the fold at one of the shorter sides.
  • Include .5" seam allowance for the 3 sides not on the fold.
With the piece folded in half, right sides together, sew the three sides.
Leave a gap large enough to fit your hand through on the long sides.

Turn it right side out and chalk/sew the center seams.
Leave a gap on one side of the center, align it with one of the outer wall gaps.


Stuff the center and close up the gap (this fit under my sewing machine nicely).

Stuff the walls. Tease filling and stuff gently, otherwise it will be lumpy.
Sew the gap closed (here is a tutorial on how to do this: Invisible Closing Seams).

Here are the beds and toys I ended up giving to the vet's office.

I ended up making a bed for Derpy out of his fleece I had been using for the animals' blanket.

I also made a simple stuffed kitty from the fabric scraps.


I have some cute prints I'd like to use for the next ones and I'm looking forward to dropping them off when Derpy goes to get his stitches removed. In case anyone is wondering, Derpy appears to be recovering well from his surgery!

Pin It Now!

Wednesday, April 17, 2013

Fabric Canvas Art

I keep seeing so many pretty fabrics and I can't help myself from buying them when I do. I wanted to frame some of them and display as fabric art, but today I decided to go a different route. I got into painting not too long ago, so I've got a decent supply of canvases. I started sewing not long after, so I haven't had a chance to use them. I figured that I would temporary put my canvases to use and save the money on frames. If you are looking for just a pop of color or to jazz up a spot in your home (my sewing area in my case), here is an idea to achieve that in just minutes. You can use more permanent solutions to attach fabric to canvas, but I chose safety pins. I can repurpose the fabric and frame without any damage and I can change out the fabric easily. When it comes to home decor, I'm a bit of a commitment-phobe. 


Materials:
  • canvas
  • fabric = canvas size + ~2"
  • bobby pins

Instructions:

Lay your canvas over fabric and cut out a rectangle big enough to cover the canvas in the back.
Iron to get any wrinkles out.

Carefully pin the fabric to the canvas material.
Be sure to pull taut, keep the print align/straight, and tuck in the corners.

And... that's it!
Hammer a nail into the wall, plop on the canvas, and enjoy the view.

Happy Wednesday!

Pin It Now!

Monday, April 15, 2013

Organize Your Fabrics With Mini Fabric Bolts

A couple of months ago I had posted a question to the sewing subreddit to ask for some ideas for fabric organization/storage and I received some great suggestions. One suggestion was to use comic boards as the core to my own mini bolts as mentioned in this blog post: Mini Fabric Bolts {tutorial}. I liked idea this a lot and borrowed it. Although I didn't bother to pin the fabric, it turned out fine. I had already starting creating fabric bolts, but was using crudely cut pieces from Target and Amazon packages. I admit it was a bit tacky. I wanted to try foam boards, but comic boards was the most cost effective solution. Comic boards can be found on Amazon, but I found out later that they were cheaper at my local comic store. Well, now I know for next time! For ~$10/100 boards, it was worth it to give it a try. I used all but about 5 boards for my bookcase of mini bolts. I was able to fit all my non-fleece fabrics in a 5-shelf bookcase! I have a ton of fleece that I have in a storage bin and also on hangers... in my coat closet still.

I posted this blog earlier that you guys might like:
I updated the shelves with wrapping paper.

Oh, and check out that suitcases I picked up at Joann's. I love them! I've always wanted a funky vintage looking suitcase. Now I have two! I just have to figure out what to put in them.


Pin It Now!

A Quick Idea To Transform A Bookcase

My coat closet has been over flooded with fabric for the last few months, but I had been procrastinating about doing something about it. I've been looking for a house in the last few months, so my excuse has always been that I would wait until I can have a dedicated craft room. Considering the lack of progress in my house hunt, I couldn't wait that long! So, last week I finally ordered a bookcase to store my fabric. I shopped around for a long time and finally decided to get a white bookcase from Walmart. I originally got one from Target, but it was um... a piece of junk. For $35, my new bookcase from Walmart was perfect for an interim solution and was sturdy enough (here's what I bought: Ameriwood 5-Shelf Bookcase, Multiple Finishes). I wasn't too thrilled about the bottom of the shelves being uncoated, so I picked up some cheap wrapping paper for $1 from Target and taped it to the bottoms. I didn't want to commit to it anything since I plan to move soon (hopefully!), but if you want a more permanent solution, try this:
  • Place a shelf on top of the wrapping paper, trace around it, and cut.
  • Spread a thin layer of Mod Podge on the bottom of the shelves.
  • Place the paper on top, align, and smooth out.
  • Let it dry, and add a couple more layers of Mod Podge over it while allowing it to dry in between. Be sure to coat the edges. Finish with a varnish, if desired.
I think this makes the bookshelf look so pretty!
If you're interested in how to organize your fabric the same way,

Pin It Now!