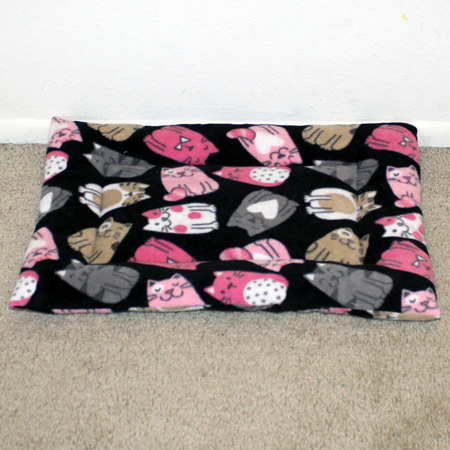
Showing posts with label dog. Show all posts

Sunday, November 17, 2013

Puppy Videos of Winston

I finally had to transfer my photos and videos from my iPhone to my laptop because I ran out of space. It was no surprise that about 80% of my media was focused on the pets :). I came across a few videos that made me smile and I thought I'd share them for all you pet lovers out there.

In order of age...

Winston is about three months old in this video. He's performing basic commands and being the smart puppy that he is... He was so tiny and cute in this! It made my heart melt all over again.

Winston is only a week older in this video, but is it just me or does he look noticeably larger than the previous video?! He's so hoppy and his legs are too long for him too control. He was the shyest student in puppy class. While all the other puppies were playing together from Day One, Winston didn't open up until Day Three. This is a video of his first real interaction with the other puppies. I don't have kids, but I imagine that what I felt at that moment would be similar to seeing your baby off to preschool and feeling proud of them for being okay. They grow up so fast!

This is Winston at about seven months. The weather was great and I thought Winston deserved some playtime at the park. It was a beautiful day and although the video is short, I thought it captured that and a beautiful dog.

Winston is about eight months old in this video. He was hot, so I let him play with a ball of ice. This video makes me chuckle :)

Pin It Now!

Tuesday, May 28, 2013

Sea Turtle Stuffed Animal

With being sick and just plain busy, I haven't been too productive in the crafts department. Instead, I've been spending most of my time reading (currently working on the first book of Game of Thrones and looking for a good book on the history of European Art) and brainstorming for project ideas. Today, I decided that I needed to complete a project, sick or not! I've been meaning to make some stuffed animals for Winston, because it seems like every week I'm spending $10 on a new toy. I wanted to make Winston something that was somewhat floppy so he can toss it around easily (he likes to play fetch with himself when I am busy). I decided to go with a sea turtle so I could do the flippers and flatter shell version. I created my own pattern for this and have included it in PDF format. It should print to scale. You can use whatever fabric type you prefer, but I used fleece.


Materials:

Instructions:
  • When tracing the pattern pieces, be sure to add 1/2" allowance and to cut on the fold where instructed.
  • Cut the body pieces on the green fabric.
  • Cut one shell piece on the dark brown fabric.
  • Cut one shell piece on the light brown fabric.
  • Cut the pupils and eyes on the black and white felt, respectively.


  • Hand sew the pupil piece on top of the white piece as seen above.
  • When finished, do not cut the thread yet.
  • Trim the excess pupil fabric off so that the pupil is flush with the white.

  • Sew the eye onto the right side of one of the head pieces (be sure to stay within your seam allowance).
  • Repeat the previous steps on the other eye and sew to the head piece symetrically.

  • Place right sides together of each set of limbs, tail, and head pieces.
  • Sew all around and leave the straight ends open.
  • Cut notches on any concave curves before turning the pieces right side out.

  • Lightly stuff the flippers so they remain somewhat flat (you could probably leave them unstuffed too).
  • Stuffed the head tightly to get a rounded shaped.

  • Sketch a shell design on you top shell piece and sew with a contrasting thread.
  • It doesn't have to be perfect and you can use random shapes in the design. I went with the design above to make sewing easier. I sewed columns of zigzags first from the head to the tail end. Then, I rotated the shell on its side and sewed the straight lines (top and bottom of the hexagons). To save time, I didn't cut my threads after each straight line. After my backstitches, I just moved the shell over the next section and continued sewing.

  • Place the bottom shell piece right side up.
  • Pin the neck of the head piece to the top of the shell (the wider, flatter end). Make sure the top of the head is facing up!
  • Also, pin the flippers as pictured above.

  • Once all the body pieces are pinned, pin the top shell right side down over the ensemble. Remove the pins from the previous step as you do this.
  • Sew all around, but leave 4" open at the tail end.
  • Turn it right side out and stuff the shell. Sea turtle shells are flatter, so do not over stuff.
  • Pin the tail in place and sew the open shut with ladder stitches.

Winston has a new friend!
    

Pin It Now!

Sunday, April 21, 2013

Pet Bed 2.0

I originally accummulated a ton of fleece and polyfill to make kitty/dog beds to donate to the Humane Society, but I decided to start by donating to my Vet's office instead for their amazing service. The first pet bed I made took me a LONG time [Cozy Fleece Dog (Cat) Bed], so I decided to do a simpler design for this project. I was able to finish three beds and some chew toys in the last couple of days, just in time for Derpy's post-surgery pickup (poor guy went in for a fractured femur if you didn't see my previous post). Each bed took me about an hour to complete. It was maybe ten minutes tops to sew, but stuffing was the hardest part. Hopefully, you are a better stuffer than I am and can finish in less time.


Materials:
  • fleece
  • stuffing

Instructions:

First, figure out the size of the bed.
  • The center should be big enough to fit your pet and have at least a 4" wall all the way around (4" was perfect for me to fit my hands through and stuff, but you may need to adjust this).
  • Cut on the fold at one of the shorter sides.
  • Include .5" seam allowance for the 3 sides not on the fold.
With the piece folded in half, right sides together, sew the three sides.
Leave a gap large enough to fit your hand through on the long sides.

Turn it right side out and chalk/sew the center seams.
Leave a gap on one side of the center, align it with one of the outer wall gaps.


Stuff the center and close up the gap (this fit under my sewing machine nicely).

Stuff the walls. Tease filling and stuff gently, otherwise it will be lumpy.
Sew the gap closed (here is a tutorial on how to do this: Invisible Closing Seams).

Here are the beds and toys I ended up giving to the vet's office.

I ended up making a bed for Derpy out of his fleece I had been using for the animals' blanket.

I also made a simple stuffed kitty from the fabric scraps.


I have some cute prints I'd like to use for the next ones and I'm looking forward to dropping them off when Derpy goes to get his stitches removed. In case anyone is wondering, Derpy appears to be recovering well from his surgery!

Pin It Now!

Monday, March 25, 2013

Pet Crate Cover

After four months of using a blanket to cover Winston's crate, I finally got around to making a cover for Winston. It was so simple and quick that I'm kicking myself in the behind for not doing it sooner. Better late than never ! :) Winston has a medium/large crate (dimensions below) and I was able to make it with 2 yards of fleece. Fleece is my preferred choice of fabric when it comes to making anything that is accessible to Winston or the kitties' teeth. It's extremely durable, cheap, and easy to work with. Fleece will stretch over time, so keep that in mind. This cover cost me less than $6.

Instructions:
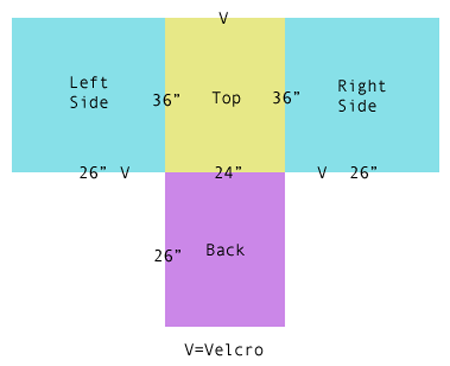
  • Follow the diagram to measure the amount of fabric you will need. Allow for 1/2" seam allowances and hemming, if necessary. I didn't hem since fleece won't fray.
  • Sew your pieces together to match the diagram. Sew right sides together.
  • Hem edges if needed.
  • Optional: I have two kitties that like to play on top of Winston's crate. Winston also jumps on the crate to escape his pen (I need to find a way to keep him in!). So, I needed to secure the cover to keep it from getting pulled off. I attached Velcro to the spots marked with "V".
    • While the Velcro is "Velcro-ed" up, cut 3 sets of 3" Velcro.
    • Detach one set and sew one end of each side together to form a 6" strip. The back sides should be facing the same direction.
    • Attach 2.5" of the backside of which ever end you prefer to the wrong side of the cover. This will allow you to sandwich a crate bar between the Velcro.
    • Do the same for the rest of the Velcro. Add more if needed.

The kitties probably use the crate just as much as Winston.
They may also enjoy it more.


Pin It Now!

Wednesday, March 20, 2013

Pet Trainer's Waist Pouch 2.0


Setzer chewed up Winston's treat bag once again. This time, it could not be saved. I salvaged the adjustment belt and recycled it in a new treat bag that I made during my lunch break. I had the design planned out and the pieces all cut the night before, so it was a breeze. I'm very happy with the way it turned out and I love the fact that is versatile. The belt can be detached and the bag can hang from a belt loop instead.


Materials:
  • (1) 7x6.5" fabric - body, back
  • (1) 7x5.5" fabric - body, front
  • (1) 7x4.75" fabric - pocket
  • (3) 3.5x2.5" contrasting fabric - hanging loop, side strap loops
  • (1) 5.75x3.25" contrasting fabric - large strap loop (you can make the middle loop the same size as the side loops. I made mine larger for versatility)
  • (1) 6" zipper
  • (1) 5" sew-on velcro
  • material for straps (see post: Pet Trainer's Waist Pouch)


Instructions:

1) Start with the back body piece right side up (longer side parallel to you). Place the zipper tab down, align top edges, and sew 1/4" from the top edge (use 1/2" seams unless otherwise stated). Put aside.


2) Place the front body piece right side up. Take the piece you sewed earlier and place the zipper tab side down over the front body piece. Align top edges and sides, and sew.


3) Open the pieces so that right sides and zipper tab side are up. Edge stitch fabric onto the front side of the zipper.


4) Center and sew one side of the velcro about 1" below the zipper on the right side of the front body piece. Sew all sides and "X" through the middle. Put aside.


5) Hem the top edge of the pocket piece, if necessary. I choose to cut along the selvage to avoid this. Center the other side of the velcro over the wrong side of the pocket piece. Place it about 1/4" below the top and sew all sides and "X" through the middle.


6) Connect the velcro pieces. Decide how high/low you want the zipper to sit. Once you have everything positioned where you want it, trim the bottom of all pieces to equal lengths.


7) Place the larger loop piece right side down. Fold long sides 1/4" in and press. Fold short sides together, press or crease the fold line (middle mark). Open up again and bring the sides towards the crease or the middle. Press. Fold in half again along the middle fold. Press. Top stitch all around. Do the same for the smaller loops, but apply action to the opposite sides. I didn't care about exposed edges for the hanging loop since I was going to sew both ends under the large loop, so I skipped a step there. You want to sew the middle and side strap loops so that the belt can slide through it.

I forgot about process pics for the next steps because I was in a hurry. They are fairly straight forward though.

8) Place right sides together, align the bottom edges, and sew the bottom seam. first This helps keep everything in place and even.

9) Unzip the zipper halfway and sew up sides. When done, I using pinking shears to trim the seams to prevent fraying since I did not do a lining. Turn right side out and it's ready to be used!

Pin It Now!

Wednesday, February 20, 2013

Pet Trainer's Waist Pouch


Update: Pet Trainer's Waist Pouch 2.0


A good pet training waist pouch isn't very expensive, but it sure feels good to make and customize your own. I wanted a black, flat, and wider pouch with front pockets and an adjustable buckle belt. The ones I found for purchase were colored and too thick. I wanted the bag to be sleeker and less noticeable (I constantly leave my home without remembering to take the bag off). This tutorial is easily customizable. I choose to line my bag because one side of the nylon material got a little funky looking after I washed it, but it's not necessary to line if you are using a fabric that is easy to clean.


Materials:
  • (2) inner piece (Determine the size of your bag and add 1/2 seam allowances. Mine was about 5x7".) - body
  • (2) outer piece the same size as above - body
  • (1) piece of outer fabric the same length as the above but about 3/4 the width of the body (i.e. 3.75x7") - front pocket panel
  • (1) set of equipment click buckle (KEEP THE PACKAGING FOR INSTRUCTIONS!)
  • webbing (Determine where the belt will fit most comfortably on you, measure around, add 5" that will be needed to attach the belt to the buckle, add more length if you want to make this adjustable to fit a bigger person. When in doubt, it's better to start with too much than not enough.)

Cost:
  • fabric ~ $4/yd (Joann)
  • webbing ~ $ 2.50/4yrds (Joann)
  • buckle ~ $2 (Joann)

Instructions:
1) Cut your body pieces.
2) Cut your pocket panel piece.

3) Fold the pocket piece length wise (right sides together) and sew along the long side.
4) Turn the piece right side out, iron if necessary, and top stitch around the edges.
5) Lay an outer piece right side up. Place the pocket panel on top and align the bottom edge and sides. Sew the sides and bottom of the pocket panel onto the outer piece. Create pockets as desired by sewing a line from the top of the pocket panel down to the bottom. Repeat stitching to make more secure.

 6) Place the zipper along the top edge of the outer piece you just sewed (tab down) and sew along the edge. Flip the zipper over and top stitch so the fabric lays flat against the zipper.
7) Lay down your second outer piece right side up. (You can customize the back of the bag as well. Mine has a smaller pouch.) Place the first outer piece on top with the zipper tab down and right sides touching. Align the zipper with the top edge of the fabric and sew along the edge.
8) Flip the top piece over and top stitch also.


 9) Place the outer pieces both right side down and turn so that the front outer piece is facing towards you. Place the first inner piece right side down along the top of the zipper. Sew this piece to the zipper and be careful to not get too close to the teeth.
10) Flip the inner piece over so it is right side up and turn so that this piece is facing towards you. Place the second inner piece right side down along the top of the zipper and sew to the zipper.
11) Unzip the zipper halfway. Bring the inner pieces together so that right sides are facing each other. Sew the remaining sides together but leave a 3" gap at the bottom. Do the same for the outer pieces, but do not leave a gap. Turn everything right side out, stitch up the gap, and set aside.


Attach the webbing to the buckle as instructed on the packaging. Here is a general overview of how to do it for the buckle I used:

12) With the female end of the buckle facing up, pull the webbing DOWN through the slot. I pulled about 2" through. I folded 1/2" at the end in and sewed in place to keep from fraying. Then, I fold the rest of the webbing under and sewed a rectangle with "X" in the center.

13) With the male facing end up, pull the webbing DOWN the right slot, then UP the left slot. The end of the webbing should end up on the front side of the belt. Fold 1/2" of the end in twice and sew in place.


I attached the belt to the bag at the sides only. I also kept the belt as one piece continuous piece. I did it this way so I could easily remove the belt and have more webbing to work with in case I need to transfer the belt to a new bag. I was concerned that the bag would get chewed up at some point and wanted to get the most use out of the belt.

My concerns were pretty valid, because one of the cats chewed up one of the small zip bags and then this bag. Here is what I found one morning:


It was a large nylon spit wad thanks to Setzer. He chewed up the liner only, so I was able to salvage the bag by removing the rest of the liner. :)


Pin It Now!

Tuesday, February 19, 2013

Reusable Zip Bags

Yes, yes, it's been awhile.. sigh. It's been extremely hectic and busy around here. At the end of the day, I'm too tired to work on any projects. Raising Winston is proving to be tougher than I thought. He is getting so big and strong and is also quite the athlete... escaping pens, climbing on crates, and jumping over his classmates in puppy kindergarten. I did manage to sew some treat bags since the dog bed. They have come in quite handy and I use them everyday. 

The first tutorial is just a simple reusable zip bag. I was going through way too many ziplock bags and that costs money! I chose a water-resistent material for easy cleaning and did not want to trouble with lining. I use it as pet treat bags, but you could use these for anything and it is a basic start to most bags.

Materials:
  • (2) pieces of a fabric that is easy to clean (Decide how big you want the treat bag and allow for 1/4" seam allowances. I went smaller bags so I used 4x5" pieces.)
  • zipper equal to the width of your bag or longer (I used 4" zippers. You can trim down a longer zipper.)

Costs:
  • fabric ~ $3/yd (Joann)
  • zipper ~ $0.75 (Joann)

Instructions:

1) You will start off by attached the front and back fabric to the zipper.
2) To do so, place the zipper tab down on the top of the first piece of fabric with its right side up. Start sewing with the zipper partially unzipped.  I usually try to stitch half way between the teeth and the edge of the zipper.
3) Flip the zipper over and top stitch close to the sewn edge.
4) The first piece should look like this when you are done.


 5) Place the second piece of fabric right side down over the first piece of fabric. The edges of the top piece should line up with the zipper edge and the bottom piece should be right side up. Sew the fabric onto the zipper.
6) Flip over the top piece and top stitch.
7) Bring right sides together and sew around the 3 sides.
8) Snip the corners, turn the bag right side up and you are done!


 Here is how mine turned out. Simple and clean. I ended up making two.


Here is how one of them looks now, because Setzer got his paws on it. He tries to get into Winston's treats all the time.

Pin It Now!

Thursday, January 10, 2013

Cozy Fleece Dog (Cat) Bed

Updated: Pet Bed 2.0


I don't know how long store bought dog beds typically last, but the one I got for Puppy Winston lasted a week before it started getting chewed up and the stuffing started getting pulled out. I figured I could probably make a better quality bed for much less than I could buy them. Then, I had an even better idea. If the bed for Winston turned out well, I would make a bunch in a variety of sizes to donate to a local shelter. I set out to make the best bed I could.

I had been using a large piece of fleece for Winston's bedding since I got him 4 weeks ago and noticed the durability and water resistance of fleece. It hadn't been damaged in anyway despite his constant chewing and tugging. Bingo, I needed to make him a fleece bed! :o It took me a while to find a dog bed tutorial that fit what I was looking for and had clear instructions. I ended up using this tutorial with minor modifications: Super King Cat (or Dog) Bed. My bed ended up measuring 30x20x4.5" from edge to edge. I purchased a bunch of fleece and 10 lbs of poly-fill and am pumped to make beds AND chew toys for animals at a shelter. Project of the month!


Materials:
  • fleece - bottom (Decide the dimensions you want. Cut on the fold instead of separate pieces like the tutorial suggested. Fold on a long side. Allow for 1/2" seams on all pieces.)
  • fleece - boundary/wall (Follow the diagram below from Super King Cat (or Dog) Bed. Since you are cutting the bottom piece on the fold, there will no seam allowances for the folded side. Be sure to not include them when you measure your boundary piece.)
  • Poly fill (I purchased a 2lbs bag and barely used 1lb)
  • needle/thread for hand-sewing

Costs:
  • bottom fleece ~ $2.75/yd (Joann)
  • boundary fleece ~ $2.50/yd (Joann)
  • Mountain Mist poly fill ~ $3.50/2lbs (Joann)

Instructions:
  • Use this diagram from the tutorial to cut your pieces:
*You may need to cut two separate pieces for the boundary and sew to make one piece like I did.


  • Fold the fabric in half with right sides together. Sew the three sides together but leave a 4" gap on the long side.
  • Turn the piece right side out.


  • If you need to join two boundary pieces, place the two pieces right sides 
  • together and sew one side together to form a single boundary piece. Hem the long sides.
  • Fold the boundary piece together right sides together. Sew the ends together to form a band.
  • Fold the band from the center so that the hemmed sides meet and right sides are facing out.


  • Pick a spot on the boundary band and sew a seam from the top of the band to the bottom. This will be your first corner seam. Match up this seam to one of the corners of the bottom piece. Position the band about 1/8" away from the edge of the bottom piece and sew together to the next corner. Leave a 3-4" gap in the middle.
  • Once you have stopped at the corner, sew your next corner seam. The easiest way to do this is to flip the sewn part of the band down and see where the top of the band hits the side of the bottom piece. Hold this position with your finger, flip the band back up, and sew a straight line from the spot you are holding down to the corner.
  • Repeat for the remaining sides.
*You can sew the corner seams ahead of time like the tutorial suggests, but I felt like it was better to sew them as I went ahead. This way, I knew that the corner seams would be perfectly placed.

This is what it should look like when you are done:


  • Stuff the bottom and boundary as desired. Be sure to get the corners well.  Consider your dog's weigh and make sure you have enough "cush" to support your dog/or cat.
  • Sew up the gaps by hand.

You can stop at this point, but I found the sharper corners undesirable. To create a more rounded corner, fold the corners down and sew in place.


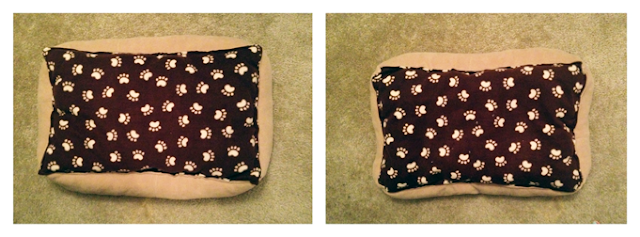
The bed in use in Winston's play pen. I plan to make another one to leave in the living room. I also made a pillow case of the same paw print for his crate pillow. The bed is slightly bigger than he needs at this time, but he's growing so fast!

Pin It Now!