Showing posts with label craft. Show all posts

Monday, March 3, 2014

Skinny Tie

Is it just me or are men's skinny ties hard to come by? There seems to be a decent selection of "slim" ties, but very rarely do I find one that's "skinny". I don't want to sound judgmental here, but slim is just not quite skinny enough. So, I decided to go on a hunt for a tie pattern that matched my skinny needs.

At the time, I was not very adventurous and relied more heavily on patterns. I found many tutorials to re-fashion regular ties into skinny ones, but I wanted to make one from scratch. I finally found this tutorial: Skinny Tie Pattern by See Kate Sew. The pattern can be used to make a square-ended tie, but I chose to stick with the classic style. If you use quilter's cotton, you will need to use interfacing like the instructions suggest. I might suggest using a heavier-weighted fabric if you want to avoid interfacing.

The tutorial was straight forward and easy to follow. It was a bit time consuming for me, but it may have been due to the fact that it was one of my earlier projects. I did not gift the tie as intended, but it was still fun to make. Also, you can shorten the length to make a woman's tie. Choose interesting prints and just have fun with it!


Pin It Now!

Tuesday, January 28, 2014

Arm Knit Scarf

A few weeks ago I found an "arm knitting" scarf tutorial on Pinterest and it blew my mind how simple and quick it was to knit a scarf using your arms as needles. I tried it tonight and finished a scarf in about thirty minutes once I figured out what I was doing. I reviewed a few arm knitting tutorials and found that this one was the most helpful: How to Arm Knit - Simply Maggie Blog. Maggie used two skeins of yarn at the same time, but I only used one. The receiver of the scarf lives in LA, so I wanted to make it less bulky. I plan to try with two skeins for myself because it is COLD COLD COLD in Missouri! Here is a photo tutorial for those who may prefer it: Arm Knitting - Flax and Twine.


Look Ma, no needles! I would recommend that you do this when you know you have at least thirty minutes to finish in one sitting.

All done! I decided not to do the cowl or infinity version. I just made mine longer and stopped after casting off.

I think that arm knitting would be a great way for a beginner knitter to easily knit an afghan. I have been wanting to do an afghan but do not have the time. It looks like I might be able to do it after all!

Happy Tuesday!

Pin It Now!

Friday, January 24, 2014

DIY Kitty Emoticon T-Shirt

I have been playing around with t-shirt paint lately and it's been a lot of fun! It is an inexpensive way to personalize a shirt for anyone. I am still trying to find the perfect fabric paint. so, if anyone has any recommendations please do share! I made a kitty emoticon t-shirt recently and here is the design for it for anyone who is interested: Kitty Emoticon T-Shirt Design.

The directions are pretty simple.

To get crisper edges you probably want to print your design on contact paper or anything that is adhesive but can also be removed easily from the fabric. I just did my printouts on regular paper. It will work fine if you are careful and not in a rush like me! For the painting process, just follow the instructions on the back of the container. This can be different from brand to brand and by time.

The first one I did was a gift for someone who is working on an iPhone game. I made a t-shirt with their logo design on it as a little encouragement. I think it turned out OK!

Below are a couple process pictures.

1) Cut out your design VERY carefully with an X-Acto knife.
2) Postion it on your t-shirt.
3) Apply paint per instructions.


Now, I need to buy more t-shirts so I can paint away.

I hope everyone has a great weekend! I am headed to Nashville tomorrow morning. Pictures to come...

Pin It Now!

Thursday, January 16, 2014

Panda Stuffed With Cuteness


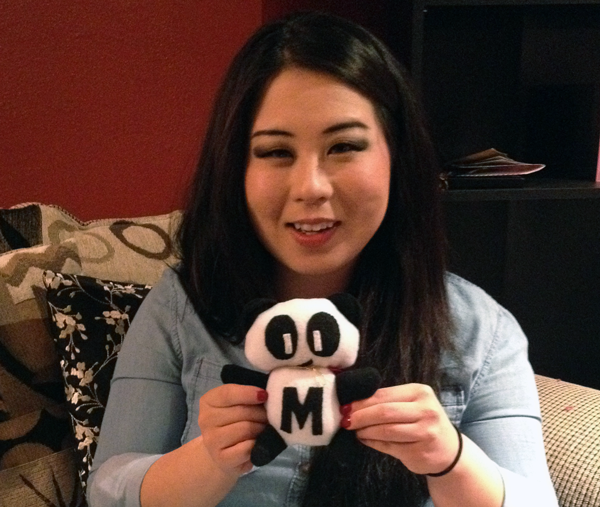
One of my good friends recently had a birthday and I was so excited to make her something. It would have been the second birthday of hers since I started my sewing endeavors. I decided to make her a stuffed panda, because we all associate her with pandas and who doesn't love pandas! I suppose that is why we all love her too :) I designed the panda with simple shapes, so it was fairly easy to do. The template is available here: Panda Pattern. I left the face up to your creativity. Please share what you come up with!

Materials:

  • 8x22" white fleece - body
  • 8x5" black fleece - limbs, ears
  • black and white felt (as needed for your face details and embellishments)
  • stuffing


Instructions:

  • Cut out all your pieces, including details for the face and any other "embellishments". I added the letter "M" for personalization for my friend's name. I think that is a nice touch, but you can just do a black oval chest as well.
  • Sew the face and embellishments by hand on the right side of the fabric. I am not so familiar with hand-sewing techniques, but I think that the stitches I used most represents blanket stitches. My stitches are perpendicular to the edge, where a straight stitch would be parallel. The reason I did it this way was so that the edges would lay flatter.

  • Sew the ear pieces together by placing wrong sides together. I wanted the raw edges for the ears, so did not plan do the whole "turn-right-side-out" routine.
  • Sew the limb pieces together by placing rights sides together. Turn right side out.
  • Stuff the limbs about 2/3 of the way. If you over-stuff, it becomes difficult to sew them to the body later.

  • Place the ears along the edge of the panda's face where the ears would go. Then, place the back piece for the head (wrong side up) on top of that. Pin together.
  • Sew the layers together and leave a 3" opening at the neck.

  • Turn right side out and stuff. Sew the gap close with blind stitches.

  • Place a body piece right side up and lay the limbs in position with the openings pointing outwards. As you can see in the picture, I have purposely made the limbs pieces slightly longer so that it would be easier to work with. Also, this why you do not want to stuff the limbs all the way.
  • Place the other body piece over the limbs, right side down. Pin and sew the layers together while leaving an opening for the neck.
  • Turn right side and stuff away! Blind stitch the opening closed.

  • Lastly, attach the head to the body. I don't know what the "best" way to do this is, but this is what I did... Pull the needle through the neck of the body, grab it from the other side, and pull the needle through the neck of the head. Repeat all the way across to secure.
Here's my friend presenting her new gift! As you may have noticed, her panda has a cape. Have some fun and add your own accessories!


Pin It Now!

Friday, December 13, 2013

First Knitting Project - Scarf


I started on a knitting project earlier this year and I finally finished today! YouTube videos came in very handy. If you want to start knitting, google casting on (your initial row of stitches), knit stitching (your basic stitch, the other is purl stitching), and binding off (closing off your last row of stitches). My grandma showed me how to do basic knitting when I was about 8 years old, so I was able to find my rhythm more quickly.

I've only worked on my scarf a little here and there, but tonight I decided try to start and finish a whole package of yarn. After four long hours of knitting and watching TV, I was able to finish the entire second half of the scarf. It took two packages of yarn to complete. I used the super chunky yarn, #13 needles, and 15 knit stitches per row. I tried using smaller needles and thinneryarn, but it felt like the end would never come. Plus, I love the look of the bigger stitches. I hope to create videos after I get more practice, so stay tuned for more!

Pin It Now!

Thursday, December 12, 2013

Template for "Secret Santa" Christmas Card


In my last post, I shared with you my free Secret Santa e-card. In addition to e-cards, I will be giving out some printed cards as well. I made a template of the same design for letter-sized media (card stock recommended) and the PDF files are available for download below. Each page will print two cards. Follow your printer's directions for proper layout and do a test print to make sure that all sides are aligned. Once the card is printed, write in your special message and jazz it up! For my cards, I hand drew the snow on the ground with a silver coloring pencil. Then, I used a small paint brush to dot glue (I used Mod Podge) on the front and back for the falling snow and sprinkled fine glitter dust over it. I also did glittered zig zags in the snow. There's many ways you can personalize yours and I'd love to see how yours turns out!

File 1: This is the front and back of the card.

File 2: This is the inside of the card.

I had a lot of fun doing this, aside from a little glittery mess I made. I think it's awesome to receive custom or handmade cards and I hope that my recipients think so too!

Pin It Now!

Wednesday, October 30, 2013

DIY Ax In A Jiffy

One would think that Halloween would be one of my favorite holidays because it's one of the best times to display some craftiness. Unfortunately, I never know what I am going to do for Halloween or if anything at all, so I never plan for it. Also, I don't like the cold so it limits me on what I can wear. I had a Halloween party to go in Boulder, so at the last minute I thought I'd go as a lumberjack. Yes, I know... it's not very creative but at least I was dressed warm with my flannel, vest, boots, and hat. I did make an impromptu ax to go with my costume though. Does that count? This was super easy and I just used trash that was around my friends. Here are some quick instructions on how to make an fake ax in about 10-15 minutes.


Materials:

  • branch about 2 ft long and 1" in diameter
  • cardboard
  • duct tape
  • red nail polish (optional)


Instructions:

Cut out a piece of cardboard in the shape above (I made it so that I had a 5" blade).
Tape the branch or stick to the center of the cardboard.
Fold the edges of the blades together and duct tape all around (this should create realistic angle).
Try to get smooth seams by avoiding overlapping as much as possible.
Don't forget to cover the top and bottoms of the blade too!

*Alternatively, you could use foil on the outside or a different silver material. Duct tape was the best solution at the time.


For the bloody version, smear some red nail polish to both sides of the blade.
I got my effect by pouring some polish on the sides and whacking it around on some shrubs. :)

HAPPY HALLOWEEEN AND BE SAFE!

Pin It Now!

Cool Pillow With Fraying Logo

Boulder, CO is easily one of my favorite cities in the US! I just got back from visiting a couple of my friends who just moved there a year ago and one of my good girlfriends also met us there. I love the mountains and my friends lived literally right next to the Flat Irons and it was beautiful. I loved the views, the weather, and the people! Most of the people seemed as laid-back and casual as they dressed and I loved the fact that it just seems like a very nonsuperficial city. I found it quite refreshing. I am bad about taking pictures, but some pictures will follow this post.

I decided I would make my friends something for being awesome hosts and welcoming my friend and me into their beautiful home. My friend, Daniel Galhardo, started a Japanese fly-fishing company in 2009 called Tenkara USA. It is a company that has grown quickly in a short amount of time and he has such a passion for what he does. Him and his wife took us to the Canyons in Boulder to teach us tenkara. I don't normally like fishing, but once I got the hang of this style of fishing, it was actually pretty fun. If you want more information about Tenkara, please visit his website: Tenkara USA. Anyway, I thought that I would make a throw pillow with their logo on it for them. It was pretty simple to do and you can do use this tutorial for any simple logo or image.


Materials:

  • canvas or upholstery fabric (I used (2) 13x13" pieces)
  • printout of logo enlarged to fit your pillow (choose a simple image with large cut out space)
  • contrasting fabric 2 inches bigger than your logo on all sides (makes it easier to sew)
  • stuffing


Instructions:
Cut out the pillow size you desire with 1/2" seam allowances all around.
Cut out the logo on the printout with an X-Acto knife.
Flip the image the wrong side up and trace it on the wrong side of a pillow piece.
Cut out the image with X-Acto knife or scissors.


Pin the contrasting fabric evenly to the wrong side of the pillow piece.
Edge stitch about 1/8" around the logo outline.
Place the right sides of the pillow pieces together and sew together with a 3-4" opening at the bottom.
Snip the corners, turn right side out and throw it in with your laundry!


When you take it out of the laundry you get this really cool fraying effect.
The stitching will keep it from fraying any more than desired.
Stuff and ladder stitch up the bottom.

Now you've got yourself a plush and cool pillow that make great gifts for anyone, including yourself :)

Pin It Now!

Friday, October 11, 2013

Start And End Your Day With Inspiration - Art For Your Room


A few weeks ago I started looking into the feng shui of my house to see what I can do to increase the positive chi or energy in my home. I found a lot of things that were "off" and set out to rectify or improve what I could without breaking the bank. One of the things I decided to do was create a motivational piece that I  could wake up to every morning and see before I go to bed. Now, you don't have to believe in the whole feng shui business, but I think that this is a good idea for anyone. Sometimes we just need a little reminder. So pick a quote or even a single word that means a lot to you and put it on a canvas.

One thing that I have learned is that I have a greater control over my emotions than I thought. Emotions are a choice and we can find many things in our current lives to satisfy the choices of how we want to feel, but we may not conscious of these choices. If we want to be angry, it is easy to find something to be angry about. If we want to be happy, we are bound to find happiness somewhere if we are willing to look for it and be open to it. It can sometimes make us vulnerable, but vulnerably is what makes us real. I wanted to remind myself of this everyday and I wanted it pretty immediately so I went right to my craft room and had at it.

It's not the most artistic piece of mine, but it's the message that counts right? :) Just pick your favorite colors and get a wide brush and blend them for the background. In my case I had a tiny brush, so it took a bit longer. Then, write your message in a contrasting color. My walls are a light minty green, so I picked calming colors that went with my wall and bedding. When I see it, it makes me smile.

Pin It Now!

Wednesday, October 9, 2013

Fabric Coasters

I should probably be better about using coasters, but I am usually not too bothered about them unless it's a glass surface. The coffee table set that I purchased from Craigslist are all glass tops and I've been meaning to make some coasters ever since I got the set. I was not able to find the right cork size pieces I needed and didn't find a fabric that I liked until last week at Joann's. The fabric was actually an upholstery hanger sample that matched my living decor. It cost me $0.40 and I figured that I could get at least 4 coasters out of it without much effort. That sounds like a good deal to me :)

Material:
  • a template to trace a square with (I used a 5x5" paper CD sleeve)
  • thick fabric

Instructions:
I folded the fabric right sides together and sewed the squares before cutting them out.
I like to cut as little as possible so I traced the squares so that each square was touching.
Then, I sewed three sides of each square 1/4" from the sides.
When all were sewn, I cut along the traced outline.

Snip the corners, turn right side out, and iron flat.
Iron the folds of the open side in and edge stitch all around.

There you have it, coasters in a pinch! No more glass on glass action or water rings!


Pin It Now!