Showing posts with label bag. Show all posts

Saturday, December 22, 2012

Messenger Bag with Magnetic Closure


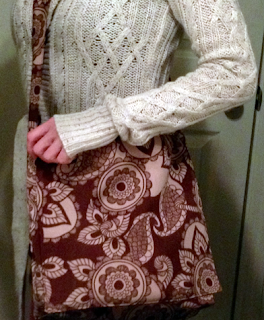
After the placemats were finished, it was onto the next present for Mike's family, a cool paisley messenger bag for Mike's sister. I love this print and the material feels A-mazing. I'd love to make something wearable with the fabric. To make this, I referenced a tutorial from the Cold Hands Warm Heart blog: Braided Belt Messenger Bag but made my own changes. I am extremely happy with how this bag turned out. Mike was impressed, phewww! ;)

Materials:
  • 16.5x13" outer fabric cut on the fold (it should measure 14.5x26" when unfolded) - outer body
  • (2) 16.5x13" lining fabric (alternatively, you could cut the same as the exterior piece if you choose a fabric that is heavy enough that it won't require interfacing) - body lining
  • 16x12.75" lining fabric - flap
  • 4x45" outer fabric - strap (measure the straps of a purse that fits you comfortable and add 2")
  • enough fusible interfacing for the, body lining, lining flap, strap (it's OK to piece together scraps for the strap) and (1) 4x4" piece
  • 6-9" zipper
  • (2) [zipper length]x6.25" outer fabric
  • 1 set of magnetic snaps
  • bobby pins
  • needle/thread for hand-sewing (optional)

Costs:
  • outer fabric ~ $2/yd, Joann
  • lining fabric ~ $1.25/yd, Joann
  • interfacing ~  $3/10yd, Joann
  • zipper ~ $0.75, Joann
  • magnetic snaps ~ $3/2, Walmart

Instructions:

First thing to do after having cut all your pieces is to iron on all interfacing for all the appropriate pieces as listed above.

Next, make the strap so that you have this ready to go later.

  • With the right side up, fold the strap in half and sew the two sides together with a 1/4" seam allowance (use throughout the project unless otherwise stated). Leave a 3" gap. It's not necessary to sew the ends.
  • Turn the piece right side out and iron flat.
  • Top-stitch all the way around with a 1/8" allowance. When you reach the gap, fold the edges inwards and sew over the gap.

  • Place one of the body lining pieces right side down with the longer end on top. Place the zipper down about 2" from the top and center it. Mark a line starting and ending 1" from the ends of the zipper. Make a rectangle about 1/4" shorter than the height of the zipper. Basically you want a rectangle small enough to give you enough allowance to sew the attached the zipper. Add the cutout lines as pictured above.
  • Cut along the lines inside the rectangle. Fold back and iron flat.
  • Flip the fabric over and place the zipper tab up centered underneath the cut out and pin.
  • Top-stitch around the zipper with 1/8" allowance.

  • Place the pocket pieces (right sides together) over the back of the zipper and sew all around.


  • Lay the the flap pieces in this order with the short end on top: inner fabric (right side up) and outer fabric (right side down). Sew three sides together, leaving a short end open.

  •  With the inner flap faced up and the opening at the bottom, fuse a couple of small pieces of interfacing over the spot where the magnetic button will go.
  • Place the snap backing over this area and mark up the slits of the plate. Cut the slits carefully and make sure not to pierce the outer fabric. Push the tabs of the top snap (with the nub) up from the inside of the flap and through the backing. Press the tabs down over the backing.
  • Add another layer of interfacing.
  • Turn the flap right side out and top-stitch the sewn sides.


  • Fold the outer fabric right sides together. Sew the two sides together, leaving the top open.
  • Flatten one corner from the side so that the side seam is in the middle. Sew a straight line across 2" from the corner. You can snip off the access. (If this isn't clear to you, please check out the link for visual aid on this step.)
  • Repeat on the other corner.
  • Do the same with the body lining: right sides together and sew the 3 sides and corners.


  • With the body turned right side out, place the flap over it with the outer flap facing the body. Match up the edges and sew the flap to the body.


  • Place the outer body (right side out) inside the inner body (which is still right side in). The flap should face the pocket.
  • Sew all around the top edges, leaving about 3" on both sides for the straps.

  • Pull the layers through the opening and push the liner in the outer body. The bag should be right side out now.
  • Put the ends of the strap through the openings, pin and and try on to test the length.
  • When satisfied, sew the strap to the bag by top-stitching all around.


  • Now, the flap needs to be shortened. Fold 1" of the flap into the bag and then back out. It's almost as if you are starting the folds of an accordian paper fan. This should shorten the flap by 2".
  • Pin and close the bag to make sure that the flap is resting in a desirable position. When satisfied, sew all around the fold. I think this makes it feel sturdier and look more well made.
  • Put the flap down and identify where the other end of the snap should be attached. Attach it like you did for the flap, but this time push it through the inner body layer. Get the tabs as flat as possible. You can leave as is or hand sew a small piece of fabric to cover the snap. Be sure to fold and iron down the sides of the fabric first to avoid fraying.


Pin It Now!

Saturday, December 1, 2012

Fold Over Clutch

Last night I scrambled to make a new clutch to use for a night out with my friends. I thought that it didn't turn out too bad. I wanted to use a stiffer fabric to give it more structure and add a magnetic button for the fold, but I had fabric that I wanted to get rid of for this test run. I don't feel comfortable with zippers yet, so I wasn't sure how this would turn out. I am going to take apart the stitches at the bottom of the clutch, turn it inside out, sew additional fabric onto the existing, and add the magnetic buttons. This will also give me an opportunity to repair something as well. :)

I love the look of black lace against beige. I didn't find any pre-made that I liked, so I sewed some black lace on a shimmery beige fabric. The inner fabric is a black costume satin (avoid this material if you can). I used Sweet Verbena's tutorial for this clutch: Lined Sequin Clutch With Zipper. I have some process pictures to share, but kept it minimal as this is not really my tutorial. I also used this opportunity to test the dry erase board as a background.


This cost me about $3 to make (the zipper was the majority of the cost, $2).


Don't mind that poor stitch on the right. :) That's just where I attached the lace to the outer fabric. I did it harshly since it wasn't going to be visible. My inner fabric frays quite a bit, so I also cut it slightly larger than the other piece. I'd recommend doing this for any difficult fabrics. It gets trimmed after sewing anyway.


Don't forget to leave a 2-3" gap on one end as well, so you can turn the bag right side out. Just top stitch across the bottom of the bag to finish. If you are comfortable with hand-sewing, then I would recommend using hidden stitches for the gap.

Pin It Now!

Friday, November 30, 2012

Cinched Overnight Tote

I haven't completed too many projects before I started this blog, but I am trying to work in posts about these pre-blog projects here and there. I also want to get the chance to share tutorials that I have found helpful, like this one from Sweet Verbena's blog: It's a Cinch BagI found it a bit too big for everyday use, but it made the perfect overnight bag for my Thanksgiving out of town.  If I were to do this again, I would reduce the dimensions by at least 25%. My material cost was $5-6.

Here is my nautical version of the bag.

It was my first bag, maybe 6 projects in, and probably my biggest projects to date. I did the outer layer with a lot precision and I am pretty proud of the stitching I did. Then, it was on to the liner bag with the zipper. Boy, I did I struggle with this! It was the first time I had worked with a zipper and I had accidentally bought a heavy duty one. I managed to get it to work and conceal the imperfections with the zipper work, but there's a lot of ugly hidden in there. ;) I got a lot of basic bag-making techniques from this tutorial.  I hope this helps any beginners out there!

Pin It Now!

Wednesday, November 28, 2012

MacBook (Faux) Leather Case With Elastic Closure


Got another tutorial for ya'll! Well, this has actually been sitting as a draft for a while now. I decided to go ahead and post it since I'm in a "tuting" mode. :) A couple weeks ago I posted that I had created a prototype of a laptop case (MacBook Air Leather Case With Elastic Closure). I wanted to wait until I had time to do another one before I posted a tutorial, but I wanted to make sure that I didn't forget anything later.  My excitement about the bag has since wore off as some of my design flaws became more obvious. But nonetheless, it's still a decent design. Maybe you can perfect it and share it with me, because it'll be a while before I do a second one. :)  I'll update the tutorial if and when I do another one though. I know I didn't take enough process pictures and it's a bit wordy, but here goes nothing!

Materials:
  • 1/2 - 3/4 yd. of a leather-like material
  • 1/2 - 3/4 yd. of a lining fabric (I choose a microsuede material)
  • black elastic (I used 3/8" because there was a limited selection.  I'd use 1/2" if available)
  • Xacto knife
  • marking tool

Costs:
  • leather ~ $5/yd, Hancock Fabrics
  • lining ~ $4/yd, Joann
  • elastic ~ $1/2yds, Walmart
Cut 1/2" from the selvage to have a clean straight line to work with.
Measure the long end of your laptop.  For this tutorial, we will refer to this as  measurement A.  Take A, add 1", and add the thickness of the thickest part of your laptop.  This will be the length of your lining fabric (make parallel to the selvage).  Measure the short end of your laptop, B.  Take Bmultiple by 2, add 1", and add the thickness of the thickest part of your laptop.  This will be the width of your lining fabric.  Cut the lining.  Mine ended up being 13x16" for my 10" air.  Place your lining over your leather as a guide.  Cut your leather to the same length but add 5" to the width for the flap.  Draw a line on the leather where the inner lining ends.  Let's call this your flap line.
Place the right side of the leather faced down.  Take measurement B and add 6.  Cut two pieces of elastic this length.  Now it's time to make the incisions for the elastic.  Mark a line the same width of your elastic starting 2" below your flap line and 2" from the left.  Then, do the same with the right side.  Take B and add .5.  Mark a line across the width of the leather equal to this distance below the flap line.  Mark another elastic line 2" above this new line and 2" from the left.  Then, do the same with the right.  Carefully cut along the elastic markings with an Xacto knife.  Pull about 1" of elastic through the top slit, then the other end through the bottom.  Be sure that it lays flat.  Do the same with the other elastic on the other side.  Pin, lay the liner over the leather piece, place your laptop in the center and test the tension of the elastic by wrapper these layers around your laptop.  Adjust the elastic positioning as need.  Then, sew the elastic on (be sure to sew so that the elastic won't be pulling in the wrong direction when the bag is closed).  At this point you can leave this part as is or cut out a decorative square piece to cover the seams or attach a back pocket to hide them.  I didn't do either, but may try next time.
Now, place the liner right side up over the leather piece.  Be sure to align the liner with the bottom of the leather piece (opposite the flap).  Sew along this side.  Turn the ensemble over, fold the sewn end up towards the flap.  You should fold about 1/2" just below where your liner is on the other side.  Pin, then sew up the sides.
Turn the bag inside out and push out the corners.  Fold the left and right sides of the flap in 1/2" and sew down.
Then fold the flap down towards the pocket, making sure to cover the liner and leaving 1/4" space from the top of pocket.  Sew all around.
*This is the step that I took the easy route on.  I originally planned to leave a wider flap (the full 5").  I was going to sew a piece of leather about 1/2" smaller than the flap onto the flap, fold in the edges of the outer flap over the inner flap, and sew around.  This would have made the flap sit much better.
I ended up tucking my flap in and then pulling the elastic over it.  I didn't leave the 1/4" gap from the previous step so the flap has a little pull that keeps it from laying completely flat.  This would also have been avoided with a thicker elastic and having a bigger flap.
Please let me know how yours turned out!

Pin It Now!

Grocery Bag Dispenser

I've got another tutorial!  Yay!  I must say that doing tutorials are little more involved than I thought they'd be.  :)  I also wish that I had better pictures to share.  For now, it's just my iPhone, bad lighting, and Photoshop.

have had a kitchen drawer overflowing with grocery bags and finally decided it was time to do something about it.  I made this grocery bag dispenser and hung it over the trash can in my kitchen.  Now, I have a much needed free drawer!  This was super easy to make.  It probably took me longer to figure out the right dimensions for the fabric and elastic pieces and how I wanted to construct it than it was to actually sew it together.  I am already thinking of making more to give to my friends as small Christmas gifts.  However, I don't think I will get around to this soon enough.  I am too eager to try a bunch of new projects instead.  :D  I didn't think to count how many bags I stuffed in there, but I am guessing there are 25-30 bags with room for a few more.  You stuff from the top and pull from the bottom (if you look closely you can see a bag poking through).

Materials:

  • 19x15" cotton fabric
  • 2x8" cotton fabric
  • 4" elastic (3/8")
  • 8" elastic (3/8") *Instead of doing an elastic opening at the top you could go with a drawstring.  Cut a 2x15" strip of fabric and follow the same steps used to make the hanging loop.
  • 1 safety pin

Costs:
  • fabric ~ $1.50/yd, Joann
  • elastic ~ $1.50/6yd, Walmart

Instructions:

Place the large piece of fabric right side down.  Fold in 3/4" on both sides and sew with enough space for the elastic to go through.
Attach a safety pin to one end one of the elastic pieces.  Leading with the pinned end, work the elastic through one of the casings you just sewed.  Stop as soon as the unpinned end disappears into the casing.  Sew this end of the casing and elastic together with zigzag stitches.  Continue working the rest of the elastic through the casing.  Remove the safety pin and sewing this end shut.  Repeat with the other elastic.  Distribute the gathering evenly.

Sew the long ends of the fabric together right side in.
Fold the remaining piece of fabric in half (long sides together) and crease.  With the right side down, fold the top and bottom towards the crease, and then fold in half.  Sew all around and keep as close to the edges as possible.
Flip the bag right side out.  Place one end of the strip over the inside vertical seams of the bag and sew over the casing stitches.  Sew the other end of the strap the same way next to it.  Be sure to expose the same side of the strap on both ends and not twisting it.  It hangs better this way.

Stick a nail in the wall, stuff, and hang!

Pin It Now!

Monday, November 19, 2012

MacBook Air Leather Case With Elastic Closure

I'm pretty ecstatic that I just designed and sewed my own laptop bag for my MacBook Air san tutorial or pattern.  It's faux leather with a microsuede lining and elastic closure.  I'm really happy with how this prototype turned out!  I'm thinking about doing a tutorial. Let me know if any of you are interested!


Pin It Now!