Showing posts with label sew. Show all posts

Thursday, January 16, 2014

Panda Stuffed With Cuteness


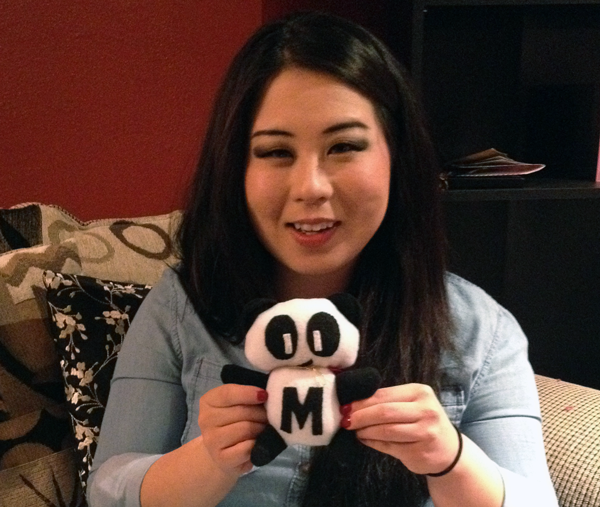
One of my good friends recently had a birthday and I was so excited to make her something. It would have been the second birthday of hers since I started my sewing endeavors. I decided to make her a stuffed panda, because we all associate her with pandas and who doesn't love pandas! I suppose that is why we all love her too :) I designed the panda with simple shapes, so it was fairly easy to do. The template is available here: Panda Pattern. I left the face up to your creativity. Please share what you come up with!

Materials:

  • 8x22" white fleece - body
  • 8x5" black fleece - limbs, ears
  • black and white felt (as needed for your face details and embellishments)
  • stuffing


Instructions:

  • Cut out all your pieces, including details for the face and any other "embellishments". I added the letter "M" for personalization for my friend's name. I think that is a nice touch, but you can just do a black oval chest as well.
  • Sew the face and embellishments by hand on the right side of the fabric. I am not so familiar with hand-sewing techniques, but I think that the stitches I used most represents blanket stitches. My stitches are perpendicular to the edge, where a straight stitch would be parallel. The reason I did it this way was so that the edges would lay flatter.

  • Sew the ear pieces together by placing wrong sides together. I wanted the raw edges for the ears, so did not plan do the whole "turn-right-side-out" routine.
  • Sew the limb pieces together by placing rights sides together. Turn right side out.
  • Stuff the limbs about 2/3 of the way. If you over-stuff, it becomes difficult to sew them to the body later.

  • Place the ears along the edge of the panda's face where the ears would go. Then, place the back piece for the head (wrong side up) on top of that. Pin together.
  • Sew the layers together and leave a 3" opening at the neck.

  • Turn right side out and stuff. Sew the gap close with blind stitches.

  • Place a body piece right side up and lay the limbs in position with the openings pointing outwards. As you can see in the picture, I have purposely made the limbs pieces slightly longer so that it would be easier to work with. Also, this why you do not want to stuff the limbs all the way.
  • Place the other body piece over the limbs, right side down. Pin and sew the layers together while leaving an opening for the neck.
  • Turn right side and stuff away! Blind stitch the opening closed.

  • Lastly, attach the head to the body. I don't know what the "best" way to do this is, but this is what I did... Pull the needle through the neck of the body, grab it from the other side, and pull the needle through the neck of the head. Repeat all the way across to secure.
Here's my friend presenting her new gift! As you may have noticed, her panda has a cape. Have some fun and add your own accessories!


Pin It Now!

Wednesday, January 1, 2014

Infinity Scarf


I hope that everyone had an amazing Christmas and a safe New Year's celebration! 2013 came and went by so quickly. I guess it's only going to feel more like that as I get older. It was a rough year and I am thankful for having great friends and lots of hobbies to escape to when needed. I caught a bit of the sewing bug last week and I am happy to end the year on a productive note.

One of the projects I finished was an infinity scarf. I am obsessed with scarves and plaid. So, naturally the two was the perfect combination. It was also super easy and cheap to make. I found a thick good quality plaid flannel in JoAnn's clearance for a little under $2.50 a yard and one yard is enough to make two scarves. So, make one for yourself and another for your significant other or friend ;)

Material:
  • 1 yd of fabric (a thicker fabric will produce a better shape, but you also want something soft and wearable too)


Instructions:

  • As mentioned earlier, one yard of fabric can make two scarves. Fold the fabric selvage to selvage and cut down the middle. It should give you a piece of fabric that will be at least 21x36". I thought this was a good size for me, but a few inches wider shouldn't be an issue either.
  • Fold the fabric long-wise, right sides together. Sew the long sides together with 1/4" seams. This should form a long tube.
  • Turn right side out.


The next step is to sew the open ends together so that the scarf will become an enclosed tube.

  • Fold the scarf in half so the open ends are on top of each other.
  • Pin the inner two layers of fabric together. Start by sewing the pinned edges together and continue sewing all the way around as far as you can. This can be somewhat difficult, but try to do as much as you can and be sure to not accidentally sew any of the other layers into it.


  • When you can't sew any further, stop. I was able to sew together all but about 2".
  • Turn right side out again and ladder stitch the gap close.

The result is a cute and cozy infinity scarf!

Pin It Now!

Wednesday, October 30, 2013

Cool Pillow With Fraying Logo

Boulder, CO is easily one of my favorite cities in the US! I just got back from visiting a couple of my friends who just moved there a year ago and one of my good girlfriends also met us there. I love the mountains and my friends lived literally right next to the Flat Irons and it was beautiful. I loved the views, the weather, and the people! Most of the people seemed as laid-back and casual as they dressed and I loved the fact that it just seems like a very nonsuperficial city. I found it quite refreshing. I am bad about taking pictures, but some pictures will follow this post.

I decided I would make my friends something for being awesome hosts and welcoming my friend and me into their beautiful home. My friend, Daniel Galhardo, started a Japanese fly-fishing company in 2009 called Tenkara USA. It is a company that has grown quickly in a short amount of time and he has such a passion for what he does. Him and his wife took us to the Canyons in Boulder to teach us tenkara. I don't normally like fishing, but once I got the hang of this style of fishing, it was actually pretty fun. If you want more information about Tenkara, please visit his website: Tenkara USA. Anyway, I thought that I would make a throw pillow with their logo on it for them. It was pretty simple to do and you can do use this tutorial for any simple logo or image.


Materials:

  • canvas or upholstery fabric (I used (2) 13x13" pieces)
  • printout of logo enlarged to fit your pillow (choose a simple image with large cut out space)
  • contrasting fabric 2 inches bigger than your logo on all sides (makes it easier to sew)
  • stuffing


Instructions:
Cut out the pillow size you desire with 1/2" seam allowances all around.
Cut out the logo on the printout with an X-Acto knife.
Flip the image the wrong side up and trace it on the wrong side of a pillow piece.
Cut out the image with X-Acto knife or scissors.


Pin the contrasting fabric evenly to the wrong side of the pillow piece.
Edge stitch about 1/8" around the logo outline.
Place the right sides of the pillow pieces together and sew together with a 3-4" opening at the bottom.
Snip the corners, turn right side out and throw it in with your laundry!


When you take it out of the laundry you get this really cool fraying effect.
The stitching will keep it from fraying any more than desired.
Stuff and ladder stitch up the bottom.

Now you've got yourself a plush and cool pillow that make great gifts for anyone, including yourself :)

Pin It Now!

Wednesday, October 9, 2013

Fabric Coasters

I should probably be better about using coasters, but I am usually not too bothered about them unless it's a glass surface. The coffee table set that I purchased from Craigslist are all glass tops and I've been meaning to make some coasters ever since I got the set. I was not able to find the right cork size pieces I needed and didn't find a fabric that I liked until last week at Joann's. The fabric was actually an upholstery hanger sample that matched my living decor. It cost me $0.40 and I figured that I could get at least 4 coasters out of it without much effort. That sounds like a good deal to me :)

Material:
  • a template to trace a square with (I used a 5x5" paper CD sleeve)
  • thick fabric

Instructions:
I folded the fabric right sides together and sewed the squares before cutting them out.
I like to cut as little as possible so I traced the squares so that each square was touching.
Then, I sewed three sides of each square 1/4" from the sides.
When all were sewn, I cut along the traced outline.

Snip the corners, turn right side out, and iron flat.
Iron the folds of the open side in and edge stitch all around.

There you have it, coasters in a pinch! No more glass on glass action or water rings!


Pin It Now!

Felt Fortune Cookies

It's been a long time since my last post and that's no good... but I'm back! It has been a crazy summer and a lot has happened since my last post. Some good, some bad, but fortunately I have been able to find the good even where least expected. So now that I am getting back on track, I decided to go back to doing the things that I love.. crafts! I've also picked up a few musical hobbies, but we'll have to see how that goes!

I just got back from a trip to Dallas for a work conference/vacation. I visited some good girlfriends of mine and I had a great time with them. I've really discovered the importance of friends over the last couple months and the trip only exemplified that. I had a friend back in St. Louis who was going to take care of my kitties while I was gone, so I left her a small thank you note inside a fortune cookie. I came up with the idea because we are always having fun with our fortune cookies at the restaurant. It was simple and quick to make and I think they would make fun party favors too. Here's how to make them:

Material:
  • something circular for tracing (I used a CD)
  • a piece of felt to fit your circle
  • a thin strip of white paper no longer than the diameter of your circle
  • optional- hot glue gun (in the picture above, I used the glue gun for the cookie on the right and sewed the left one)

Instructions:
Trace and cut your circle on the piece of felt.
Fold the circle loosely in half and push in at the center of the fold while pulling the corners back.
Pin the center together and it should look like the bottom two pictures.
Sew the center together from the inside of the cookie or glue the center from the outside.

 Lastly, write a message onto your strip of paper and you've got a cute fortune cookie!
Do something nice for a friend :)

Pin It Now!