Showing posts with label crafts. Show all posts

Wednesday, January 1, 2014

Infinity Scarf


I hope that everyone had an amazing Christmas and a safe New Year's celebration! 2013 came and went by so quickly. I guess it's only going to feel more like that as I get older. It was a rough year and I am thankful for having great friends and lots of hobbies to escape to when needed. I caught a bit of the sewing bug last week and I am happy to end the year on a productive note.

One of the projects I finished was an infinity scarf. I am obsessed with scarves and plaid. So, naturally the two was the perfect combination. It was also super easy and cheap to make. I found a thick good quality plaid flannel in JoAnn's clearance for a little under $2.50 a yard and one yard is enough to make two scarves. So, make one for yourself and another for your significant other or friend ;)

Material:
  • 1 yd of fabric (a thicker fabric will produce a better shape, but you also want something soft and wearable too)


Instructions:

  • As mentioned earlier, one yard of fabric can make two scarves. Fold the fabric selvage to selvage and cut down the middle. It should give you a piece of fabric that will be at least 21x36". I thought this was a good size for me, but a few inches wider shouldn't be an issue either.
  • Fold the fabric long-wise, right sides together. Sew the long sides together with 1/4" seams. This should form a long tube.
  • Turn right side out.


The next step is to sew the open ends together so that the scarf will become an enclosed tube.

  • Fold the scarf in half so the open ends are on top of each other.
  • Pin the inner two layers of fabric together. Start by sewing the pinned edges together and continue sewing all the way around as far as you can. This can be somewhat difficult, but try to do as much as you can and be sure to not accidentally sew any of the other layers into it.


  • When you can't sew any further, stop. I was able to sew together all but about 2".
  • Turn right side out again and ladder stitch the gap close.

The result is a cute and cozy infinity scarf!

Pin It Now!

Saturday, June 29, 2013

Stegosaurus Remade

I'm excited that for the first time, I've been commissioned to sew! I'm thrilled, because it involves making stuffed animals and those are so much fun. I love coming up with the patterns and designs, but I just hate stuffing them! Today, I got a chance to remake my Stegosaurus from a few months ago (original post here). This was my first stuffed animal and the only one I have used a pattern for so far. I feel like making this the first time gave me a good start because it made me understand the general how-tos of a simple stuffed animals. I've been able to expand on it since then. I could see a significant improvement in my second go at it. The feet were very difficult for me to do the first time and I had jagged looking feet pads. I decided that I would baste the feet to the legs first this time and it helped. The feet pads turned out much smoother and circular. The legs also turned out thicker, which I like. I'm still experimenting with stuffing brands and different techniques, but please do tell me your recommendations! In the next week I get to remake my turtle and design a doggy hand puppet. I've never done a puppet before, so I'm excited for the challenge! Well, that's what I am working :) That and moving... but moving is not nearly as fun.

Pin It Now!

Friday, June 21, 2013

Vintage [Wine] Bottle Carrier

I went to a really cool Thursday evening called Remake Thursdays hosted by a local community called Perennial. Perennial's mission is to teach the community about repurposing products and being eco-friendly through DIY sessions and workshops. This was my first Remake Thursday and for a small $5 donation I was able to make a vintage [wine] bottle carrier out of leather belts. There were a couple other small knick knacks I could have made as well, but I was happy to leave with just the bottle carrier and a chance to share it with all of you! I got permission from the host to take pictures of their tutorial pictures and to share it on my blog. With that being said, the instructional images below were made available by Perennial. The first few steps in the written instructions are for verbatim, but I added to/changed up the rest since they seemed unclear to me.

Materials:

  • 2-3 belts
  • 4 paper brads or other fastener
  • awl
  • bottle

Instructions:

1.
Select two belts! Belt 1 should be solid leather and Belt 2 can be whatever you like.
They do need to be about the same width so either buckle will work on either belt.


 2.
Fasten the end of Belt 2 into the buckle of Belt 1.


3.
Slip the end of Belt 1 through the buckle of Belt 2.
Hang this loop over your shoulder and pull Belt 1 to shorten the loop to a comfortable length.
Trim belt 1 right after it exits Belt 2's buckle.


4.
Use an awl to punch a hole in the new end of 1 so you can buckle it to Belt 2 to make a loop.
[I was able to skip this step and use the existing belt holes, but this will depend on your belt.)


5.
Use the scrap you cut from Belt 2 to cut two lengths to wrap around the bottle and Belt 2.
[If the scraps are not long enough then this is where the third belt will be necessary.]
You don't want it too loose but just snug enough so that the bottle won't move around much. 


6.
Place the center of Belt 2 underneath your bottle.
Hold the loop in the air so the belt meets the sides of your bottle and align buckles.
Wrap your newly cut strips around the bottle, making sure the ends overlap the larger loop.
Mark where they will keep your bottle secure, then punch the holes.


 7.
Mark where you punch a hole on each end of the strip and punch the holes.
Punch a hole equal distances from the end holes on each strip.


8.
Take one end of a strip, align its hole with a Belt 2 hole, and wrap the other end all the way around.
Three holes should be aligned at this point; fasten with paper brads.
Also, fasten a brad to the opposite hole. Repeat with the last strip.


Click the image below to view a large image of the original instructions.


Here is the carrier on me. Please excuse the blurry image!


Pin It Now!

Thursday, May 9, 2013

Sewing An Apron For Mother's Day

I decided not to wait until the last minute to sew a Mother's Day gift for Mike's mom. It feels great to cross one project off my list for this week. I gave Mike's mom an apron last year and I decided to give her another one this year. I am satisfied with the pattern I draft, but will give it another go when I make one for myself. I found a cute cupcake remmant a while back at Hancock Fabrics and I had aprons in mind when I saw it. The best part is that I have enough left to make myself one with this fabric too. What do you think?


Materials:
  • (1) 3/4 - 1' of outer fabric
  • (1) 3/4 - 1' of lining fabric
  • (1) 66x6" strip of lining fabric - waist tie (piece together several pieces, if necessary)
  • (2) 22x3" strips of lining fabric - neck ties
  • (1) 12x12" of lining fabric - pocket (optional)

Instructions:

I fit XS-S sizes and included my measurements for each section of the apron below. The only modification I would make next time is to cut about 2" from each side of the chest section. I rounded all corners, but the waist corners do not need to be rounded (I had intended to add the waist tie differently).
Top - 13"
Waist - 16"
Bottom - 20"
Top to waist - 10.5"
Waist to bottom - 21"
(1/2'" seam allowance)

When the two body pieces were cut, I started preparing the accent pieces. I ironed after each step.


  • Iron the waist strip in half long ways wrong sides together.
  • Open up with the right side facing down.
  • Fold the corners towards the middle crease line, making sure to come to a clean point.

  • Fold the both top and bottom edges towards the middle.

  • Fold the whole piece in half again and top stitch all around.

  • Do the same thing for the neck ties, but skip the pointed corners.
  • Fold in half to get your crease line.
  • Fold top and bottom edges towards the crease line.
  • Fold a little bit of one end in before folding the whole strip in half again. (You can leave the other end unfolded because it will be hidden between the two body pieces)

Optional pocket:

[You can create the pocket pieces like the ties straps (fold sides to the middle and then in half) If your fabric is thick enough, you can just hem the sides. I did it the following way to get the desired thickness for the fabric I was using.]
  • Fold the pocket piece in half right sides together.
  • Sew the three unfolded sides together and leave a 3" gap.
  • Turn the pocket right side out and edge stitch the folded side. This will be the top of the pocket.

  • Iron the other three sides in about 1/2".


  • Sew the two body pieces right sides together, but leave the top of the apron open.
  • Cut notches into the corner seam allowances and turn right side out.
  • Pin the neck ties in place (in between the front and back body pieces at the opening) and top stitch the whole apron.
  • Pin the waist tie amd pocket in place and sew onto the apron.


 Good luck to all your Mother's Day projects!

Pin It Now!

Sunday, April 21, 2013

Pet Bed 2.0

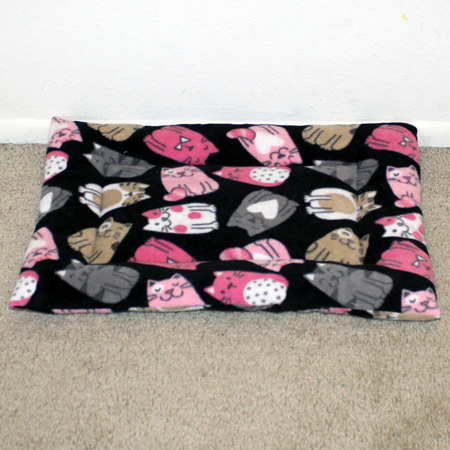
I originally accummulated a ton of fleece and polyfill to make kitty/dog beds to donate to the Humane Society, but I decided to start by donating to my Vet's office instead for their amazing service. The first pet bed I made took me a LONG time [Cozy Fleece Dog (Cat) Bed], so I decided to do a simpler design for this project. I was able to finish three beds and some chew toys in the last couple of days, just in time for Derpy's post-surgery pickup (poor guy went in for a fractured femur if you didn't see my previous post). Each bed took me about an hour to complete. It was maybe ten minutes tops to sew, but stuffing was the hardest part. Hopefully, you are a better stuffer than I am and can finish in less time.


Materials:
  • fleece
  • stuffing

Instructions:

First, figure out the size of the bed.
  • The center should be big enough to fit your pet and have at least a 4" wall all the way around (4" was perfect for me to fit my hands through and stuff, but you may need to adjust this).
  • Cut on the fold at one of the shorter sides.
  • Include .5" seam allowance for the 3 sides not on the fold.
With the piece folded in half, right sides together, sew the three sides.
Leave a gap large enough to fit your hand through on the long sides.

Turn it right side out and chalk/sew the center seams.
Leave a gap on one side of the center, align it with one of the outer wall gaps.


Stuff the center and close up the gap (this fit under my sewing machine nicely).

Stuff the walls. Tease filling and stuff gently, otherwise it will be lumpy.
Sew the gap closed (here is a tutorial on how to do this: Invisible Closing Seams).

Here are the beds and toys I ended up giving to the vet's office.

I ended up making a bed for Derpy out of his fleece I had been using for the animals' blanket.

I also made a simple stuffed kitty from the fabric scraps.


I have some cute prints I'd like to use for the next ones and I'm looking forward to dropping them off when Derpy goes to get his stitches removed. In case anyone is wondering, Derpy appears to be recovering well from his surgery!

Pin It Now!

Wednesday, April 17, 2013

Fabric Canvas Art

I keep seeing so many pretty fabrics and I can't help myself from buying them when I do. I wanted to frame some of them and display as fabric art, but today I decided to go a different route. I got into painting not too long ago, so I've got a decent supply of canvases. I started sewing not long after, so I haven't had a chance to use them. I figured that I would temporary put my canvases to use and save the money on frames. If you are looking for just a pop of color or to jazz up a spot in your home (my sewing area in my case), here is an idea to achieve that in just minutes. You can use more permanent solutions to attach fabric to canvas, but I chose safety pins. I can repurpose the fabric and frame without any damage and I can change out the fabric easily. When it comes to home decor, I'm a bit of a commitment-phobe. 


Materials:
  • canvas
  • fabric = canvas size + ~2"
  • bobby pins

Instructions:

Lay your canvas over fabric and cut out a rectangle big enough to cover the canvas in the back.
Iron to get any wrinkles out.

Carefully pin the fabric to the canvas material.
Be sure to pull taut, keep the print align/straight, and tuck in the corners.

And... that's it!
Hammer a nail into the wall, plop on the canvas, and enjoy the view.

Happy Wednesday!

Pin It Now!

Monday, April 15, 2013

Organize Your Fabrics With Mini Fabric Bolts

A couple of months ago I had posted a question to the sewing subreddit to ask for some ideas for fabric organization/storage and I received some great suggestions. One suggestion was to use comic boards as the core to my own mini bolts as mentioned in this blog post: Mini Fabric Bolts {tutorial}. I liked idea this a lot and borrowed it. Although I didn't bother to pin the fabric, it turned out fine. I had already starting creating fabric bolts, but was using crudely cut pieces from Target and Amazon packages. I admit it was a bit tacky. I wanted to try foam boards, but comic boards was the most cost effective solution. Comic boards can be found on Amazon, but I found out later that they were cheaper at my local comic store. Well, now I know for next time! For ~$10/100 boards, it was worth it to give it a try. I used all but about 5 boards for my bookcase of mini bolts. I was able to fit all my non-fleece fabrics in a 5-shelf bookcase! I have a ton of fleece that I have in a storage bin and also on hangers... in my coat closet still.

I posted this blog earlier that you guys might like:
I updated the shelves with wrapping paper.

Oh, and check out that suitcases I picked up at Joann's. I love them! I've always wanted a funky vintage looking suitcase. Now I have two! I just have to figure out what to put in them.


Pin It Now!

A Quick Idea To Transform A Bookcase

My coat closet has been over flooded with fabric for the last few months, but I had been procrastinating about doing something about it. I've been looking for a house in the last few months, so my excuse has always been that I would wait until I can have a dedicated craft room. Considering the lack of progress in my house hunt, I couldn't wait that long! So, last week I finally ordered a bookcase to store my fabric. I shopped around for a long time and finally decided to get a white bookcase from Walmart. I originally got one from Target, but it was um... a piece of junk. For $35, my new bookcase from Walmart was perfect for an interim solution and was sturdy enough (here's what I bought: Ameriwood 5-Shelf Bookcase, Multiple Finishes). I wasn't too thrilled about the bottom of the shelves being uncoated, so I picked up some cheap wrapping paper for $1 from Target and taped it to the bottoms. I didn't want to commit to it anything since I plan to move soon (hopefully!), but if you want a more permanent solution, try this:
  • Place a shelf on top of the wrapping paper, trace around it, and cut.
  • Spread a thin layer of Mod Podge on the bottom of the shelves.
  • Place the paper on top, align, and smooth out.
  • Let it dry, and add a couple more layers of Mod Podge over it while allowing it to dry in between. Be sure to coat the edges. Finish with a varnish, if desired.
I think this makes the bookshelf look so pretty!
If you're interested in how to organize your fabric the same way,

Pin It Now!

Travel Laundry Bag (Basic Drawstring Bag)


I'm a bit of a clean freak, so when I travel I always make sure to bring extra grocery bags to keep my dirty clothes separate from my clean clothes. I recently bought some nylon travel bags for my shoes and that gave me the idea to make a large travel laundry bag for my clothes. I have a mini road trip coming up at the end of the month, so it would be a perfect time to use it. It is basically just a large drawstring bag that fits a weekend's worth of bags. The drawstring is continuous, so it does not need to be tied on each side. Just pull from the sides and the bag will scrunch close. This also makes it fold away nicely. Alternatively, you can use this tutorial to make bags for any use and any size.


Materials:
  • (1) 28x18" lightweight fabric with short end cut on the fold (will measure 56x18") - body
  • (1) 1.5x36" strip of fabric - drawstring

Instructions:

  • Fold the strip in half long wise with right sides together and press.
  • Sew the long side together and turn right side out.

  • Fold the bag piece right side together. Iron down 1" of the tops for the drawstring casing (wrong sides together).
  • Fold in 1/4" of the casing openings to prevent frays, press, and sew. You need to just hem enough to cover the area used for the casing.

  • Sew the casings in place. Be sure to leave enough room for the drawstring to go through.

  • Sew the sides of the bag together. (I used pinking shears on all exposed edges.) 

  • Attach a safety pin to one of the drawstring and use it to push the drawstring through both casings. You should end up with the both ends of the drawstring next to each other.
  • Sew the ends of the drawstring together by inserting one end inside the opening of the other. Tuck 1/4" of outer piece under and sew in place. (I was a little eager and had already closed the ends of my string in the picture above.) 

  • Turn the bag right side out and pack in your luggage for your next trip!

Pin It Now!

Monday, April 8, 2013

Fabric Picture Frames (Convertible to Hanging or Standing)


I am so excited to have a good friend of mine visit me from Dallas at the end of this month. She's been incredibly supportive about my sewing projects and aspirations. She's also been so patient to listen to me talk about it as frequently as I do. I wanted to make some her something, because there's nothing more rewarding to me then making something for someone I care about. I designed these fabric picture frames for her to hang in her cubicle (she's an accountant so she's there a lot right now!) They can be propped on a desk or hung on a wall. She had mentioned that she wanted to print out our Seattle/Portland trip pictures to display. The frames were pretty quick to make once I figured out how big I wanted them to be. This tutorial is for a frame with a 2.5" square window, but you can customize this easily.


Materials:

  • (1) 12.5x5" piece of fabric (I went with upholstery fabric)
  • (1) manila folder
  • embroidery floss and needle
  • small piece of adhesive Velcro

Instructions:


  • Take your piece of fabric and mark up the lines as pictured above on the wrong side of the fabric. The black lines are the fold/hem lines and the red lines are cut lines. The pattern has 4 panels, starting from the top of the image: 1) back stand-outer, back stand-inner, frame front, frame back.
  • Start by sewing around the 2.5" square. This is to keep the corners from fraying when you cut your "X". (I unfortunately didn't think to do this when I made my frames. It dawned on me while I was in bed.)
  • Cut "X" through the middle of that square. Trim down the triangle pieces to about .25" flaps. 

  • Fold/iron these flaps on the 2.5" square line, wrong sides together. Sew them down. (Iron consistently throughout this project to keep good creases and to get a more professional look.)
  • Hem the long sides, then hem the short sides.
  • Cut a piece of manila folder into a 4.5" square.
  • Fold the two back stand pieces wrong sides together and slip the folder piece in between. The folder piece should not be exposed, so trim if necessary. Sew all 4 sides together. (The manila folder adds stiffness.)

  • Fold the frame back and front wrong sides together and sew only the outer three other sides. The unsewn side will be the opening to insert a picture.
  • Cut another piece of manila folder just big enough to fit inside the pocket.


  • Stick a small piece of Velcro at the bottom of the insides of frame. This keeps it flattened when the frame is hung.
  • Poke the embroidery floss from the inside of the fold of the frame about 1/2" from the center. Pull the floss back through with equal spacing. Leave a small loop on the outside of the frame, tie the ends from the inside and trim. The loop can be pulled taut and hidden when used on a desktop.

I think these would make great gifts and I can't wait to make more!

Pin It Now!