Showing posts with label accessories. Show all posts

Monday, March 3, 2014

Skinny Tie

Is it just me or are men's skinny ties hard to come by? There seems to be a decent selection of "slim" ties, but very rarely do I find one that's "skinny". I don't want to sound judgmental here, but slim is just not quite skinny enough. So, I decided to go on a hunt for a tie pattern that matched my skinny needs.

At the time, I was not very adventurous and relied more heavily on patterns. I found many tutorials to re-fashion regular ties into skinny ones, but I wanted to make one from scratch. I finally found this tutorial: Skinny Tie Pattern by See Kate Sew. The pattern can be used to make a square-ended tie, but I chose to stick with the classic style. If you use quilter's cotton, you will need to use interfacing like the instructions suggest. I might suggest using a heavier-weighted fabric if you want to avoid interfacing.

The tutorial was straight forward and easy to follow. It was a bit time consuming for me, but it may have been due to the fact that it was one of my earlier projects. I did not gift the tie as intended, but it was still fun to make. Also, you can shorten the length to make a woman's tie. Choose interesting prints and just have fun with it!


Pin It Now!

Tuesday, January 28, 2014

Arm Knit Scarf

A few weeks ago I found an "arm knitting" scarf tutorial on Pinterest and it blew my mind how simple and quick it was to knit a scarf using your arms as needles. I tried it tonight and finished a scarf in about thirty minutes once I figured out what I was doing. I reviewed a few arm knitting tutorials and found that this one was the most helpful: How to Arm Knit - Simply Maggie Blog. Maggie used two skeins of yarn at the same time, but I only used one. The receiver of the scarf lives in LA, so I wanted to make it less bulky. I plan to try with two skeins for myself because it is COLD COLD COLD in Missouri! Here is a photo tutorial for those who may prefer it: Arm Knitting - Flax and Twine.


Look Ma, no needles! I would recommend that you do this when you know you have at least thirty minutes to finish in one sitting.

All done! I decided not to do the cowl or infinity version. I just made mine longer and stopped after casting off.

I think that arm knitting would be a great way for a beginner knitter to easily knit an afghan. I have been wanting to do an afghan but do not have the time. It looks like I might be able to do it after all!

Happy Tuesday!

Pin It Now!

Friday, June 21, 2013

Vintage [Wine] Bottle Carrier

I went to a really cool Thursday evening called Remake Thursdays hosted by a local community called Perennial. Perennial's mission is to teach the community about repurposing products and being eco-friendly through DIY sessions and workshops. This was my first Remake Thursday and for a small $5 donation I was able to make a vintage [wine] bottle carrier out of leather belts. There were a couple other small knick knacks I could have made as well, but I was happy to leave with just the bottle carrier and a chance to share it with all of you! I got permission from the host to take pictures of their tutorial pictures and to share it on my blog. With that being said, the instructional images below were made available by Perennial. The first few steps in the written instructions are for verbatim, but I added to/changed up the rest since they seemed unclear to me.

Materials:

  • 2-3 belts
  • 4 paper brads or other fastener
  • awl
  • bottle

Instructions:

1.
Select two belts! Belt 1 should be solid leather and Belt 2 can be whatever you like.
They do need to be about the same width so either buckle will work on either belt.


 2.
Fasten the end of Belt 2 into the buckle of Belt 1.


3.
Slip the end of Belt 1 through the buckle of Belt 2.
Hang this loop over your shoulder and pull Belt 1 to shorten the loop to a comfortable length.
Trim belt 1 right after it exits Belt 2's buckle.


4.
Use an awl to punch a hole in the new end of 1 so you can buckle it to Belt 2 to make a loop.
[I was able to skip this step and use the existing belt holes, but this will depend on your belt.)


5.
Use the scrap you cut from Belt 2 to cut two lengths to wrap around the bottle and Belt 2.
[If the scraps are not long enough then this is where the third belt will be necessary.]
You don't want it too loose but just snug enough so that the bottle won't move around much. 


6.
Place the center of Belt 2 underneath your bottle.
Hold the loop in the air so the belt meets the sides of your bottle and align buckles.
Wrap your newly cut strips around the bottle, making sure the ends overlap the larger loop.
Mark where they will keep your bottle secure, then punch the holes.


 7.
Mark where you punch a hole on each end of the strip and punch the holes.
Punch a hole equal distances from the end holes on each strip.


8.
Take one end of a strip, align its hole with a Belt 2 hole, and wrap the other end all the way around.
Three holes should be aligned at this point; fasten with paper brads.
Also, fasten a brad to the opposite hole. Repeat with the last strip.


Click the image below to view a large image of the original instructions.


Here is the carrier on me. Please excuse the blurry image!


Pin It Now!

Thursday, May 9, 2013

Sewing An Apron For Mother's Day

I decided not to wait until the last minute to sew a Mother's Day gift for Mike's mom. It feels great to cross one project off my list for this week. I gave Mike's mom an apron last year and I decided to give her another one this year. I am satisfied with the pattern I draft, but will give it another go when I make one for myself. I found a cute cupcake remmant a while back at Hancock Fabrics and I had aprons in mind when I saw it. The best part is that I have enough left to make myself one with this fabric too. What do you think?


Materials:
  • (1) 3/4 - 1' of outer fabric
  • (1) 3/4 - 1' of lining fabric
  • (1) 66x6" strip of lining fabric - waist tie (piece together several pieces, if necessary)
  • (2) 22x3" strips of lining fabric - neck ties
  • (1) 12x12" of lining fabric - pocket (optional)

Instructions:

I fit XS-S sizes and included my measurements for each section of the apron below. The only modification I would make next time is to cut about 2" from each side of the chest section. I rounded all corners, but the waist corners do not need to be rounded (I had intended to add the waist tie differently).
Top - 13"
Waist - 16"
Bottom - 20"
Top to waist - 10.5"
Waist to bottom - 21"
(1/2'" seam allowance)

When the two body pieces were cut, I started preparing the accent pieces. I ironed after each step.


  • Iron the waist strip in half long ways wrong sides together.
  • Open up with the right side facing down.
  • Fold the corners towards the middle crease line, making sure to come to a clean point.

  • Fold the both top and bottom edges towards the middle.

  • Fold the whole piece in half again and top stitch all around.

  • Do the same thing for the neck ties, but skip the pointed corners.
  • Fold in half to get your crease line.
  • Fold top and bottom edges towards the crease line.
  • Fold a little bit of one end in before folding the whole strip in half again. (You can leave the other end unfolded because it will be hidden between the two body pieces)

Optional pocket:

[You can create the pocket pieces like the ties straps (fold sides to the middle and then in half) If your fabric is thick enough, you can just hem the sides. I did it the following way to get the desired thickness for the fabric I was using.]
  • Fold the pocket piece in half right sides together.
  • Sew the three unfolded sides together and leave a 3" gap.
  • Turn the pocket right side out and edge stitch the folded side. This will be the top of the pocket.

  • Iron the other three sides in about 1/2".


  • Sew the two body pieces right sides together, but leave the top of the apron open.
  • Cut notches into the corner seam allowances and turn right side out.
  • Pin the neck ties in place (in between the front and back body pieces at the opening) and top stitch the whole apron.
  • Pin the waist tie amd pocket in place and sew onto the apron.


 Good luck to all your Mother's Day projects!

Pin It Now!

Wednesday, April 17, 2013

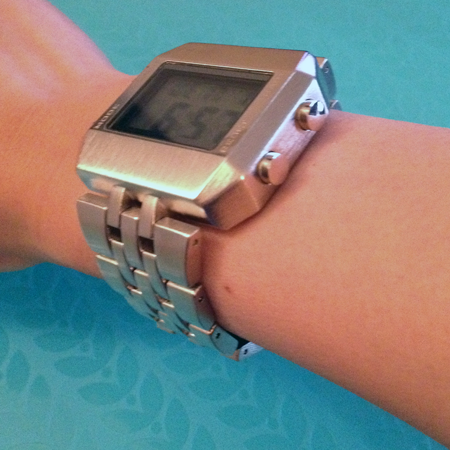
How To Remove Links From A Watch

If I had to choose my favorite accessory, I'd have to say watches. I especially love BIG chunky link watches, so I love men's watches. Unfortunately, my wrist is too small to fit even women's link watches out of the box, much less men's. I dont typically get high end watches, so I don't have the luxury of getting link service included. It's definitely painful to spend $10 to get links removed from a $20 watch, so that's never an option. I decided that it was a good idea to invest in a link remover. I couldn't believe how cheap they were... I got mine on Amazon for ~$4 (SE JT6218 Watch Band Link Remover, 5-Piece). This is a must-have if you have problems fitting watches out of the box! It comes with 3 pin punches of different sizes, a base with groves to fit bands of different thicknesses, and a hammer with a soft and hard end. It is so easy to use and within a minute or two, I can remove 50% of links from a men's watch.

I have some quick tips here for those attempting to do this:

Many watches have markings on the links to indicate which direction to hammer.
In this example, you want to hammer in the same direction as the arrows.

If there aren't any arrows, then just look for the side where the pins sit further inside the hole.
In this example, the top row of links has the side where you should hammer down facing up.
The pins in the bottom row of links are flush and this is the side from where pins with come out.

1) Use the right sized pin puncher 2) Tap gently 3) Tap on the correct side.
It's that easy!

[The pins only fit back in one way (tip first), so you'll know which end is correct pretty easily.]

*Make sure you take an equal amount of links from each side of the band.
You want your watch to be balanced and to sit evenly on your wrist.

Pin It Now!

Monday, April 15, 2013

Travel Laundry Bag (Basic Drawstring Bag)


I'm a bit of a clean freak, so when I travel I always make sure to bring extra grocery bags to keep my dirty clothes separate from my clean clothes. I recently bought some nylon travel bags for my shoes and that gave me the idea to make a large travel laundry bag for my clothes. I have a mini road trip coming up at the end of the month, so it would be a perfect time to use it. It is basically just a large drawstring bag that fits a weekend's worth of bags. The drawstring is continuous, so it does not need to be tied on each side. Just pull from the sides and the bag will scrunch close. This also makes it fold away nicely. Alternatively, you can use this tutorial to make bags for any use and any size.


Materials:
  • (1) 28x18" lightweight fabric with short end cut on the fold (will measure 56x18") - body
  • (1) 1.5x36" strip of fabric - drawstring

Instructions:

  • Fold the strip in half long wise with right sides together and press.
  • Sew the long side together and turn right side out.

  • Fold the bag piece right side together. Iron down 1" of the tops for the drawstring casing (wrong sides together).
  • Fold in 1/4" of the casing openings to prevent frays, press, and sew. You need to just hem enough to cover the area used for the casing.

  • Sew the casings in place. Be sure to leave enough room for the drawstring to go through.

  • Sew the sides of the bag together. (I used pinking shears on all exposed edges.) 

  • Attach a safety pin to one of the drawstring and use it to push the drawstring through both casings. You should end up with the both ends of the drawstring next to each other.
  • Sew the ends of the drawstring together by inserting one end inside the opening of the other. Tuck 1/4" of outer piece under and sew in place. (I was a little eager and had already closed the ends of my string in the picture above.) 

  • Turn the bag right side out and pack in your luggage for your next trip!

Pin It Now!

Thursday, April 4, 2013

Make Suspenders In Just Ten Minutes

www.peoplestylewatch.com
Suspenders... love them or hate them? I have secretly always wanted to rock a pair of suspenders, but I wasn't sure if I could pull it off. I am still not sure, but I thought these women made it look easy enough. So, I am going to give it a try in my wardrobe. I had plenty of elastic, so all I needed were suspender clips. These were super easy to make and only took me about ten minutes to whip up. It cost me about $4 to make, so the margin of savings wasn't as great as other things I've made. I do like the fact it's much easier to customize when making it (or anything) yourself. I may try to do some tan, red, or leather ones if I end up loving them.


Materials:
  • 1" elastic (How much elastic do you need? Put on a pair of pants that you would use with suspenders. Start your measuring tape halfway between your zipper and your side. Bring the measuring tape over your shoulder to the opposite side, about halfway between the middle of your back and your side. Multiply by 2 and add 4".)
  • (4) 1" suspender clippers

Instructions:

  • Loop 1" of one end of the elastic through the front of the clip and sew it in place with zigzag stitches. Both sides of elastic look about the same, but one side is slightly flatter than the other. I let the flatter side face out. The difference is almost microscopic though. :)
  • Clip the elastic to the back your pants and bring the rest of the elastic to the front. Position and pull taut but not too tight. Mark where the elastic meets the top of your pants.
  • Unclip the strap and cut the first strap 1" below the marked line. Sew the second clip on the other end in the same fashion as the first. The front of both clips should face the same direction.
  • Cut the second strap to match the length of the first. Be sure to accommodate for the 1" loop on each end.


  • Once all clips are sewn, try the clips on. Carefully pin or mark the cross section in the back.
  • Sew a diamond shape in this cross section. Alternatively, you could leave this unsewn and use a decorative pin to hold the straps together. (I would have done this, but I didn't have any on hand. I can take my stitches out and pin at a later time.)

DONE!

Pin It Now!

Monday, March 25, 2013

Quick and Cheap Scarf


I have been in a sewing frenzy. I get highly motivated, sew a lot, then burn out. Hopefully, I can keep my momentum going! One thing that I have been meaning to do is make scarves with the pretty fabrics I bought for just that. Almost all of my scarf fabrics are remnants from Joann. I made this scarf with about half a yard of fabric. I love the spring print and there's little textured bumps on the right side. I also liked the fact it's not so obvious as to which side is the right side until you are closer. I did not pre-wash the fabric. I figured it would be easier to hem and I wanted the hemmed edges to shrivel and warp some. I like a messy edge.

Instructions:
  • I used half a yard of fabric but you could give or take a few inches. I cut it in half so that the selvage sides measured 12". I used a scarf that I liked as reference and decided to make it about 60" long.
  • I wanted to sew the pieces together so that the seam would in the middle of the scarf (at back of the neck), so I cut two pieces 30" long and sewed right sides together.
  • Hem up the sides. I preferred to use the selvage for the ends.
SOOOO simple and CHEAP! I see so many pretty scarves at the store that I am always tempted to buy, but I can't justify it knowing how easy it is to just make my own! This cost me about $1.


Pin It Now!

Saturday, December 22, 2012

Messenger Bag with Magnetic Closure


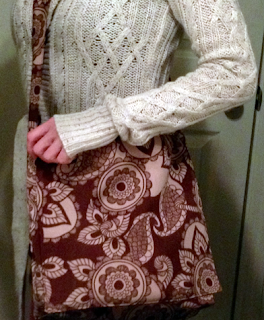
After the placemats were finished, it was onto the next present for Mike's family, a cool paisley messenger bag for Mike's sister. I love this print and the material feels A-mazing. I'd love to make something wearable with the fabric. To make this, I referenced a tutorial from the Cold Hands Warm Heart blog: Braided Belt Messenger Bag but made my own changes. I am extremely happy with how this bag turned out. Mike was impressed, phewww! ;)

Materials:
  • 16.5x13" outer fabric cut on the fold (it should measure 14.5x26" when unfolded) - outer body
  • (2) 16.5x13" lining fabric (alternatively, you could cut the same as the exterior piece if you choose a fabric that is heavy enough that it won't require interfacing) - body lining
  • 16x12.75" lining fabric - flap
  • 4x45" outer fabric - strap (measure the straps of a purse that fits you comfortable and add 2")
  • enough fusible interfacing for the, body lining, lining flap, strap (it's OK to piece together scraps for the strap) and (1) 4x4" piece
  • 6-9" zipper
  • (2) [zipper length]x6.25" outer fabric
  • 1 set of magnetic snaps
  • bobby pins
  • needle/thread for hand-sewing (optional)

Costs:
  • outer fabric ~ $2/yd, Joann
  • lining fabric ~ $1.25/yd, Joann
  • interfacing ~  $3/10yd, Joann
  • zipper ~ $0.75, Joann
  • magnetic snaps ~ $3/2, Walmart

Instructions:

First thing to do after having cut all your pieces is to iron on all interfacing for all the appropriate pieces as listed above.

Next, make the strap so that you have this ready to go later.

  • With the right side up, fold the strap in half and sew the two sides together with a 1/4" seam allowance (use throughout the project unless otherwise stated). Leave a 3" gap. It's not necessary to sew the ends.
  • Turn the piece right side out and iron flat.
  • Top-stitch all the way around with a 1/8" allowance. When you reach the gap, fold the edges inwards and sew over the gap.

  • Place one of the body lining pieces right side down with the longer end on top. Place the zipper down about 2" from the top and center it. Mark a line starting and ending 1" from the ends of the zipper. Make a rectangle about 1/4" shorter than the height of the zipper. Basically you want a rectangle small enough to give you enough allowance to sew the attached the zipper. Add the cutout lines as pictured above.
  • Cut along the lines inside the rectangle. Fold back and iron flat.
  • Flip the fabric over and place the zipper tab up centered underneath the cut out and pin.
  • Top-stitch around the zipper with 1/8" allowance.

  • Place the pocket pieces (right sides together) over the back of the zipper and sew all around.


  • Lay the the flap pieces in this order with the short end on top: inner fabric (right side up) and outer fabric (right side down). Sew three sides together, leaving a short end open.

  •  With the inner flap faced up and the opening at the bottom, fuse a couple of small pieces of interfacing over the spot where the magnetic button will go.
  • Place the snap backing over this area and mark up the slits of the plate. Cut the slits carefully and make sure not to pierce the outer fabric. Push the tabs of the top snap (with the nub) up from the inside of the flap and through the backing. Press the tabs down over the backing.
  • Add another layer of interfacing.
  • Turn the flap right side out and top-stitch the sewn sides.


  • Fold the outer fabric right sides together. Sew the two sides together, leaving the top open.
  • Flatten one corner from the side so that the side seam is in the middle. Sew a straight line across 2" from the corner. You can snip off the access. (If this isn't clear to you, please check out the link for visual aid on this step.)
  • Repeat on the other corner.
  • Do the same with the body lining: right sides together and sew the 3 sides and corners.


  • With the body turned right side out, place the flap over it with the outer flap facing the body. Match up the edges and sew the flap to the body.


  • Place the outer body (right side out) inside the inner body (which is still right side in). The flap should face the pocket.
  • Sew all around the top edges, leaving about 3" on both sides for the straps.

  • Pull the layers through the opening and push the liner in the outer body. The bag should be right side out now.
  • Put the ends of the strap through the openings, pin and and try on to test the length.
  • When satisfied, sew the strap to the bag by top-stitching all around.


  • Now, the flap needs to be shortened. Fold 1" of the flap into the bag and then back out. It's almost as if you are starting the folds of an accordian paper fan. This should shorten the flap by 2".
  • Pin and close the bag to make sure that the flap is resting in a desirable position. When satisfied, sew all around the fold. I think this makes it feel sturdier and look more well made.
  • Put the flap down and identify where the other end of the snap should be attached. Attach it like you did for the flap, but this time push it through the inner body layer. Get the tabs as flat as possible. You can leave as is or hand sew a small piece of fabric to cover the snap. Be sure to fold and iron down the sides of the fabric first to avoid fraying.


Pin It Now!