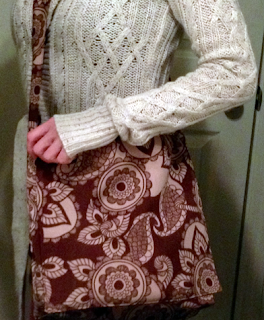
After the placemats were finished, it was onto the next present for Mike's family, a cool paisley messenger bag for Mike's sister. I love this print and the material feels A-mazing. I'd love to make something wearable with the fabric. To make this, I referenced a tutorial from the Cold Hands Warm Heart blog: Braided Belt Messenger Bag but made my own changes. I am extremely happy with how this bag turned out. Mike was impressed, phewww! ;)
Materials:
- 16.5x13" outer fabric cut on the fold (it should measure 14.5x26" when unfolded) - outer body
- (2) 16.5x13" lining fabric (alternatively, you could cut the same as the exterior piece if you choose a fabric that is heavy enough that it won't require interfacing) - body lining
- 16x12.75" lining fabric - flap
- 4x45" outer fabric - strap (measure the straps of a purse that fits you comfortable and add 2")
- enough fusible interfacing for the, body lining, lining flap, strap (it's OK to piece together scraps for the strap) and (1) 4x4" piece
- 6-9" zipper
- (2) [zipper length]x6.25" outer fabric
- 1 set of magnetic snaps
- bobby pins
- needle/thread for hand-sewing (optional)
Costs:
- outer fabric ~ $2/yd, Joann
- lining fabric ~ $1.25/yd, Joann
- interfacing ~ $3/10yd, Joann
- zipper ~ $0.75, Joann
- magnetic snaps ~ $3/2, Walmart
Instructions:
First thing to do after having cut all your pieces is to iron on all interfacing for all the appropriate pieces as listed above.
Next, make the strap so that you have this ready to go later.
 |
- With the right side up, fold the strap in half and sew the two sides together with a 1/4" seam allowance (use throughout the project unless otherwise stated). Leave a 3" gap. It's not necessary to sew the ends.
- Turn the piece right side out and iron flat.
- Top-stitch all the way around with a 1/8" allowance. When you reach the gap, fold the edges inwards and sew over the gap.
- Place one of the body lining pieces right side down with the longer end on top. Place the zipper down about 2" from the top and center it. Mark a line starting and ending 1" from the ends of the zipper. Make a rectangle about 1/4" shorter than the height of the zipper. Basically you want a rectangle small enough to give you enough allowance to sew the attached the zipper. Add the cutout lines as pictured above.
- Cut along the lines inside the rectangle. Fold back and iron flat.
- Flip the fabric over and place the zipper tab up centered underneath the cut out and pin.
- Top-stitch around the zipper with 1/8" allowance.
- Place the pocket pieces (right sides together) over the back of the zipper and sew all around.
- Lay the the flap pieces in this order with the short end on top: inner fabric (right side up) and outer fabric (right side down). Sew three sides together, leaving a short end open.
- With the inner flap faced up and the opening at the bottom, fuse a couple of small pieces of interfacing over the spot where the magnetic button will go.
- Place the snap backing over this area and mark up the slits of the plate. Cut the slits carefully and make sure not to pierce the outer fabric. Push the tabs of the top snap (with the nub) up from the inside of the flap and through the backing. Press the tabs down over the backing.
- Add another layer of interfacing.
- Turn the flap right side out and top-stitch the sewn sides.
- Fold the outer fabric right sides together. Sew the two sides together, leaving the top open.
- Flatten one corner from the side so that the side seam is in the middle. Sew a straight line across 2" from the corner. You can snip off the access. (If this isn't clear to you, please check out the link for visual aid on this step.)
- Repeat on the other corner.
- Do the same with the body lining: right sides together and sew the 3 sides and corners.
- With the body turned right side out, place the flap over it with the outer flap facing the body. Match up the edges and sew the flap to the body.
- Place the outer body (right side out) inside the inner body (which is still right side in). The flap should face the pocket.
- Sew all around the top edges, leaving about 3" on both sides for the straps.

- Pull the layers through the opening and push the liner in the outer body. The bag should be right side out now.
- Put the ends of the strap through the openings, pin and and try on to test the length.
- When satisfied, sew the strap to the bag by top-stitching all around.
- Now, the flap needs to be shortened. Fold 1" of the flap into the bag and then back out. It's almost as if you are starting the folds of an accordian paper fan. This should shorten the flap by 2".
- Pin and close the bag to make sure that the flap is resting in a desirable position. When satisfied, sew all around the fold. I think this makes it feel sturdier and look more well made.
- Put the flap down and identify where the other end of the snap should be attached. Attach it like you did for the flap, but this time push it through the inner body layer. Get the tabs as flat as possible. You can leave as is or hand sew a small piece of fabric to cover the snap. Be sure to fold and iron down the sides of the fabric first to avoid fraying.


